
Spring and summer arrive quickly in central Arizona. Currently, we’re enjoying –70° temperatures while bragging to our East Coast friends, but in a couple of months the rest of the country will be the ones laughing. Triple digits are right around the corner, so that means I’ve got to take advantage of the nice weather while I can.
The Southwest has famously long growing seasons. So that means I get a head start on all my outdoor projects. I’m still so enthralled with the glass-topped outdoor table I built last year that I decided to build it a friend. I built a handy, rolling planter and was able to incorporate more of the gorgeous black hardware from the Simpson Strong-Tie® Outdoor Accents® line.
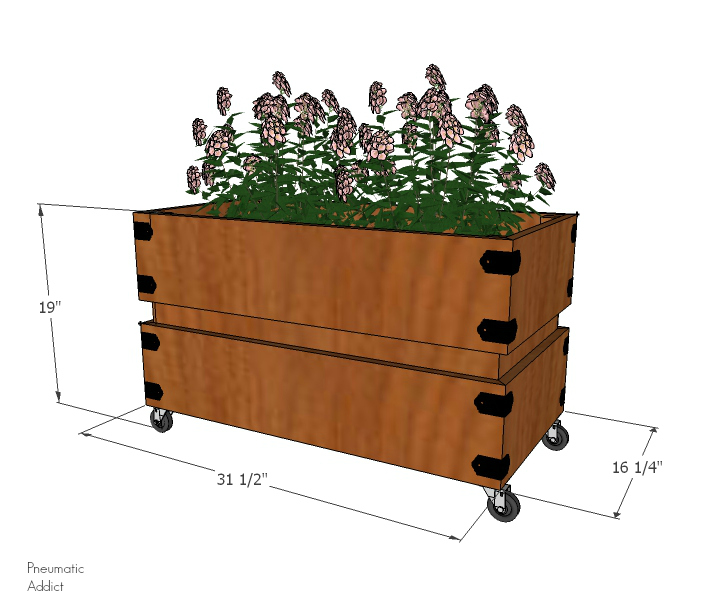
Whenever you’re planning an outdoor project, you want to make sure you use a moisture-resistant material like cedar, redwood or pressure-treated fir. I used cedar to construct my new rolling planter, and it worked like a dream. I was able to build the whole thing in just a couple of hours.
Materials List:
- (1) 2×2 x 96″ board
- (4) 1×8 x 96″ board
- (4) 2″ casters
- (16) Outdoor Accents® APA21 angles
- (32) Outdoor Accents® 1 1/2″ connector screws
- (8) 2 1/2″ Deck-Drive™ DSV Wood screws for exterior use
- (12) 1 1/4″ Deck-Drive™ DSV Wood screws for exterior use
- 1 1/4″ finish nails or brads
Tools Needed:
- 3/16″ hex bit
- T25 torque bit
- 5/32″ drill bit
- Miter saw
- Brad nailer or hammer
- Speed square
- Power drill
- Tape measure
- Pencil
- Safety glasses
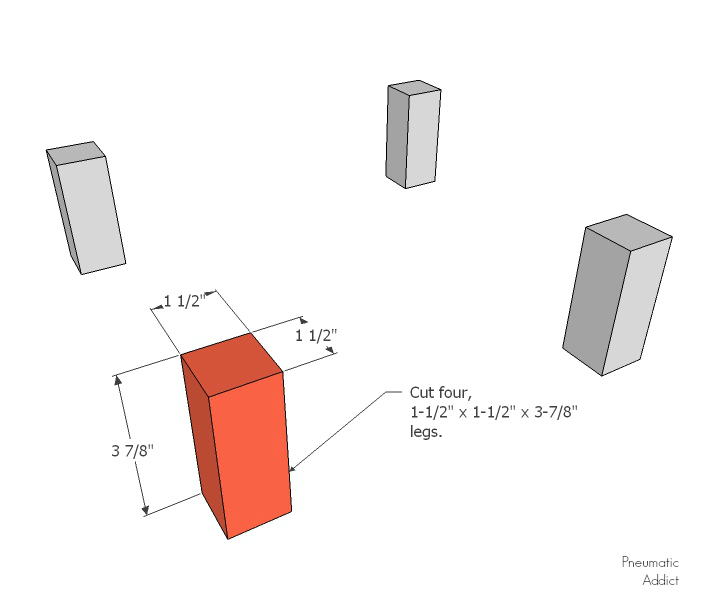
- Starting with the 2×2 x 96″ board, cut four 1 1/2″ x 1 1/2″ x 3 7/8″ legs.
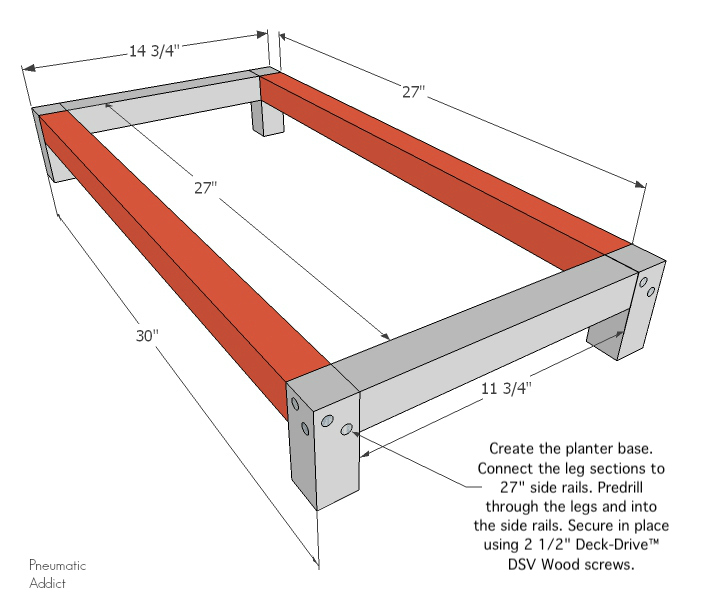
2. Connect pairs of legs to each other, creating two leg sections, using 11 3/4″ end rails. Predrill through the legs and into the end rails. Secure using 2 1/2″ Deck-Drive™ DSV Wood screws.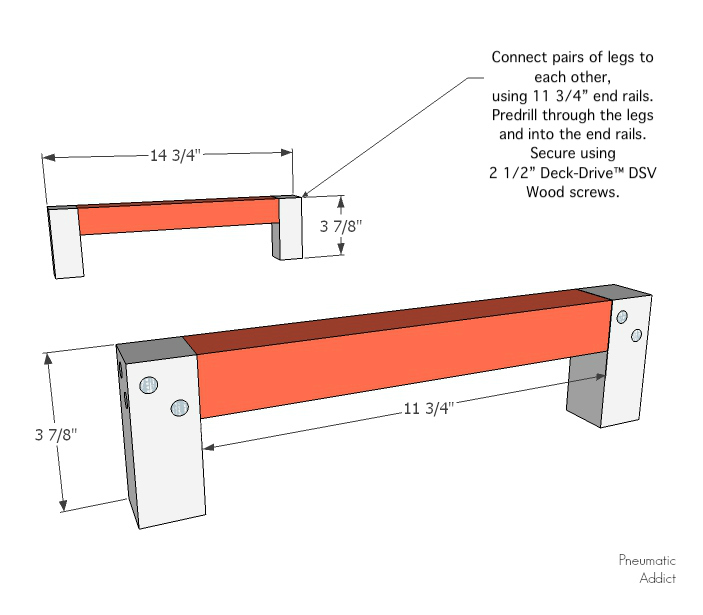 3. Create the planter base. Connect the leg sections to 27″ side rails. Predrill through the legs and into the side rails. Secure in place using 2 1/2″ Deck-Drive™ DSV Wood screws.
4. Place two 30″ floor boards on top of the base. Make sure to leave a 1/4″ gap between boards to allow for drainage from the plants. Predrill through the floor boards and into the base. Secure using 1 1/4″ Deck-Drive™ DSV Wood screws.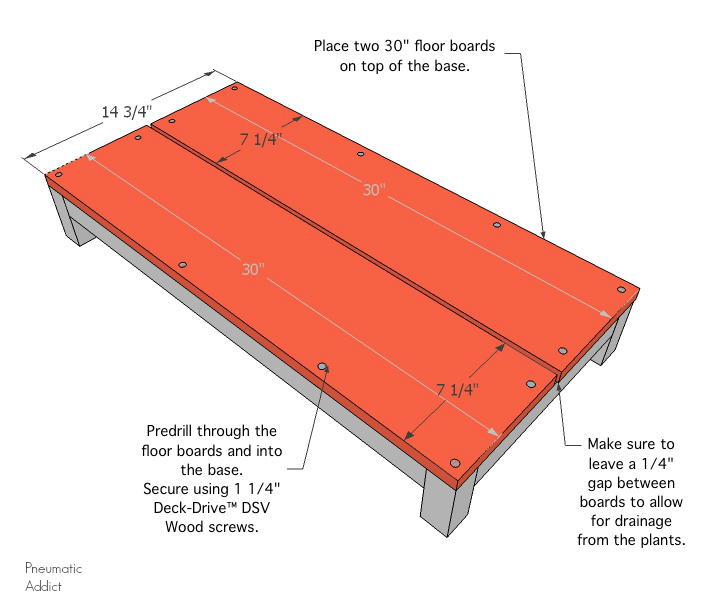
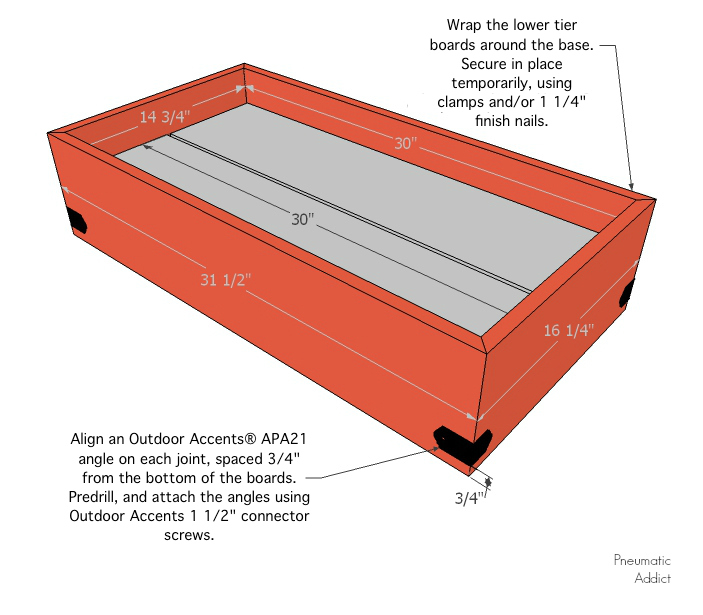
5. Cut four 31 1/2″ long boards, mitered at 45° on both ends (length measured long point to long point). Cut four 16 1/4″ boards, mitered at 45° on both ends (length measured long point to long point). Use two of the longer boards and two of the shorter boards to create the lower tier of the planter box.
Wrap the lower tier boards around the base. Secure in place temporarily, using clamps and/or 1 1/4″ finish nails. Align an Outdoor Accents® APA21 angle on each joint, spaced 3/4″ from the bottom of the boards. Predrill, and attach the angles using Outdoor Accents 1 1/2″ connector screws.
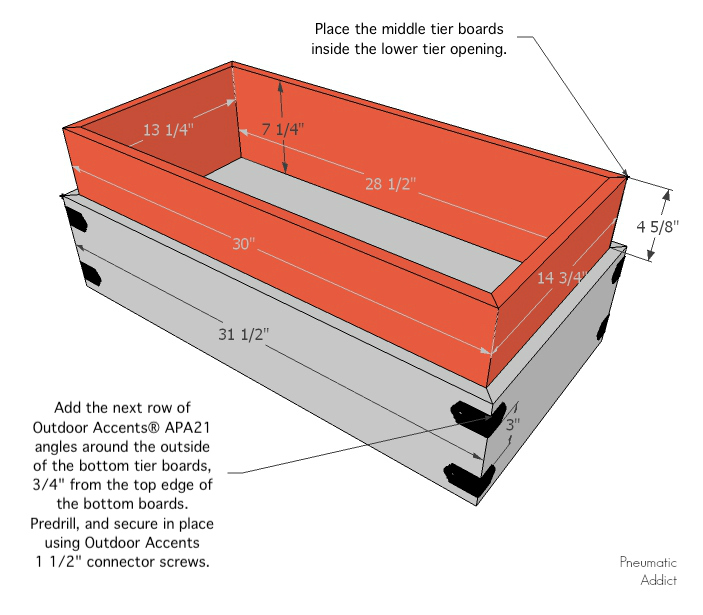
6. Cut middle tier boards. Cut two 7 1/4″ x 30″ boards mitered at 45° on both ends (length measured long point to long point). Cut two 7 1/4″ x 14 3/4″ boards mitered at 45° on both ends (length measured long point to long point).
Place the middle tier boards inside the lower tier opening. Add the next row of Outdoor Accents® APA21 angles around the outside of the bottom tier boards, 3/4″ from the top edge of the bottom boards. Predrill, and secure in place using Outdoor Accents 1 1/2″ connector screws.
7. Align the remaining upper tier boards around the center tier. Allow a 2″ gap between top and bottom boards. Secure in place temporarily by using clamps and/or finish nails.
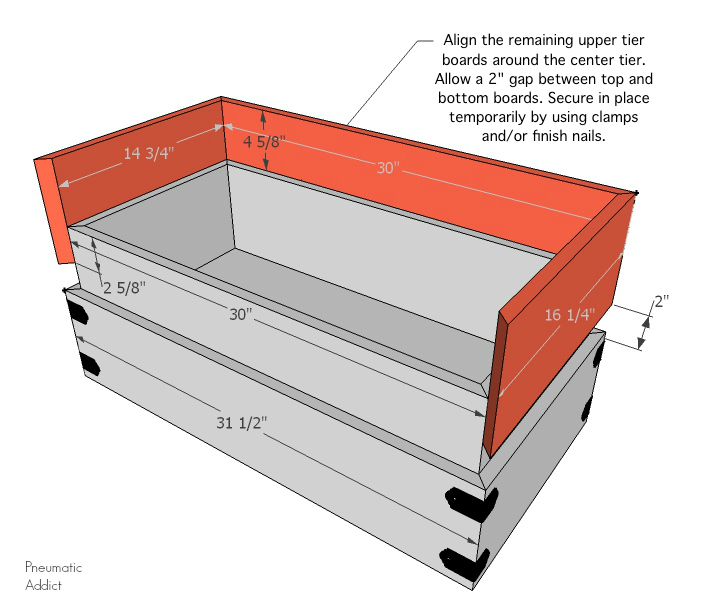
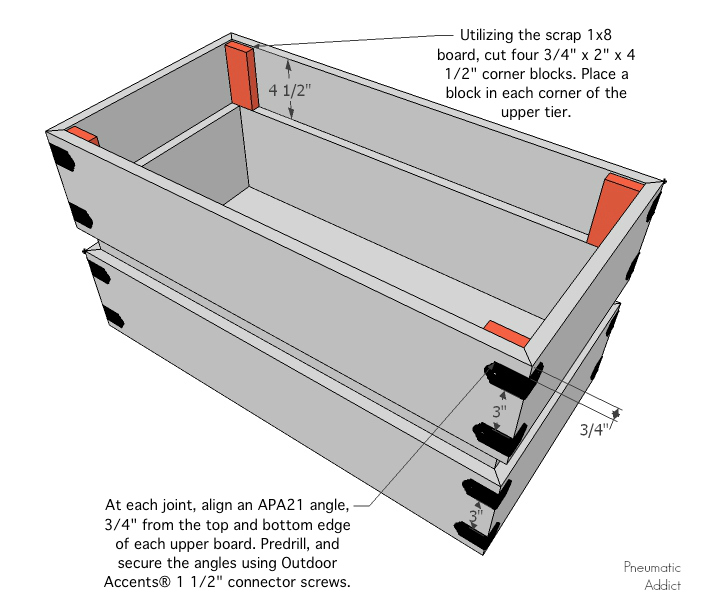
8. Utilizing the scrap 1×8 board, cut four 3/4″ x 2″ x 4 1/2″ corner blocks. Place a block in each corner of the upper tier.
At each joint, align an APA21 angle, 3/4″ from the top and bottom edge of each upper board. Predrill, and secure the angles using Outdoor Accents® 1 1/2″ connector screws.
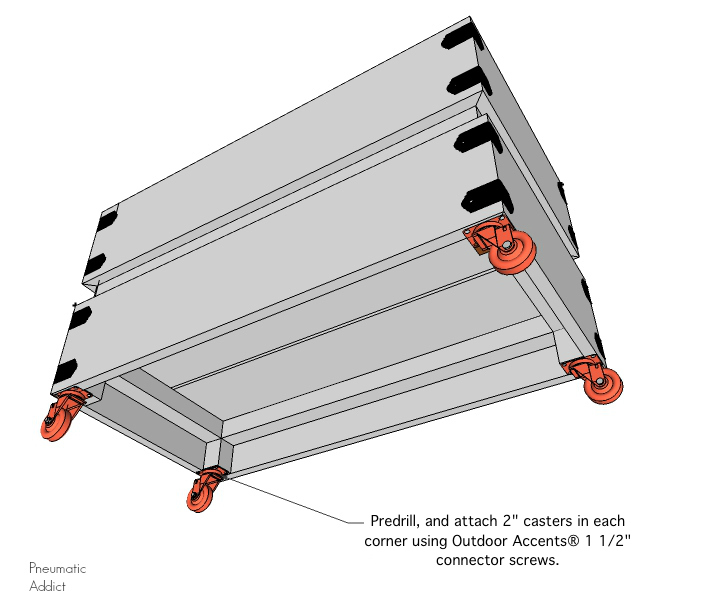
9. Flip the planter box over to add four swivel casters. Predrill, and attach 2″ casters in each corner using Outdoor Accents® 1 1/2″ connector screws.
10. Add landscape fabric to the inside of the box if you like, then fill the opening with whatever pretty plants your heart desires.
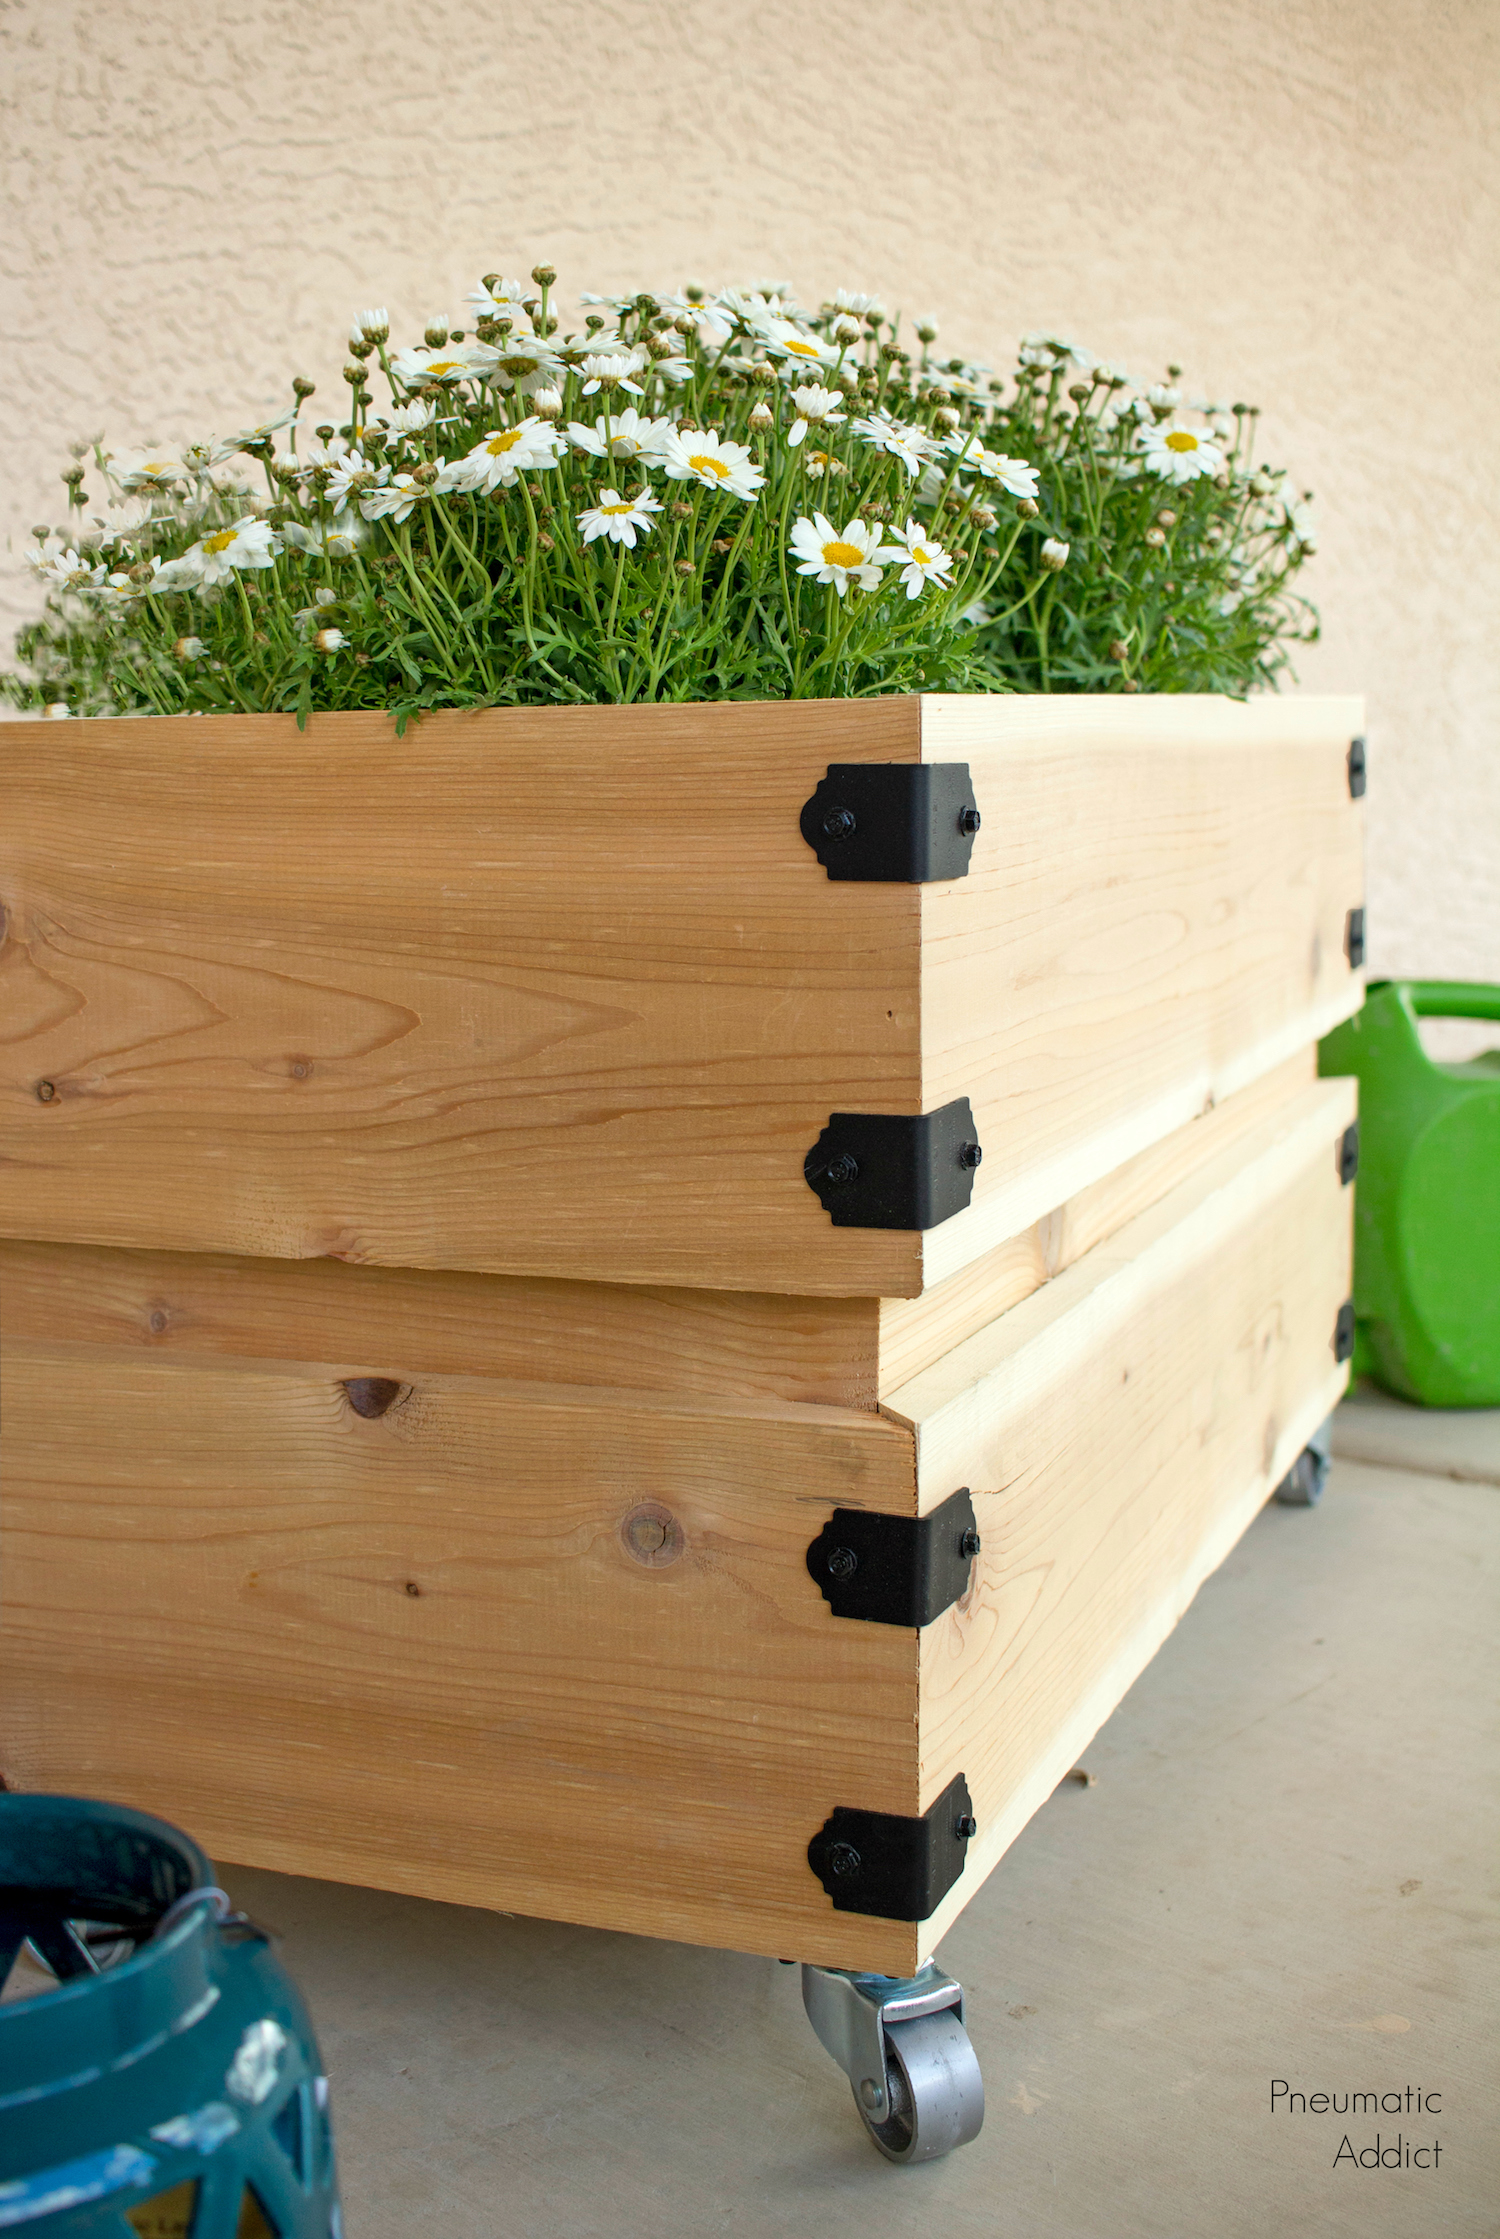
The black Simpson APA21 angles and matching hex screws really set this simple box off! I love the color contrast between the raw cedar and the dark hardware.
I haven’t decided whether I should apply a finish or leave the wood bare. Cedar is one of those special woods that doesn’t need to be sealed, and it will develop a gorgeous gray patina with age.

But what’s the best part of my new planter box? It rolls! Who doesn’t love a planter box you can move around on your patio without heavy lifting? The casters are a great style addition and really come in handy.
Now let’s cross our fingers that I can keep my plants alive till summer. Happy building!

Additional Simpson-inspired DIY Projects:
Outdoor DIY Projects
- How to Build a Cool, Modern Chicken Coop
- How to Build a Floating Deck
- How to Build a Outdoor Accents Pergola
- How to Build a Simple Rolling Planter


