
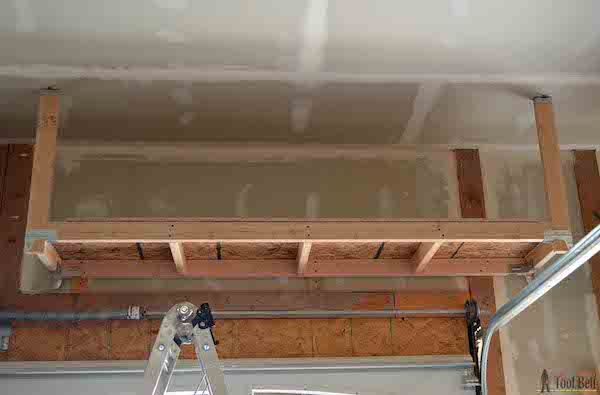
I’m always looking for great storage ideas and solutions, especially in the garage where things tend to pile up. There is a lot of empty space above the garage door, so why not take advantage of it and add suspended garage shelves? These shelves are great for seasonal item storage and stuff that you want to keep but do not need that often. Simpson Strong-Tie connectors make these DIY storage shelves easy to build and install. The depth of the shelves are 2-feet deep but can be easily modified for 3-feet deep.
Materials (for each 8′ long x 2′ deep shelf)
- 4 – 2″ x 4″ x 8′ stud
- ½ – sheet of ½” OSB or plywood
- 2 – Simpson Strong-Tie® 20-gauge Rigid Tie™ RTR connectors
- 4 – Simpson Strong-Tie® Rigid Tie RTC2Z corner connectors (1/2 workbench hardware kit)
- 2 ½” Strong-Drive® SD #9 Structural Connector Screws
- Simpson Strong-Tie Wafer-Head #8×1 ¼” screws
- 1 ¼” brad nails
Cut List
- 1 – 2″ x 4″ x 96″ wood
- 1 – 2″ x 4″ x 92″ wood
- 2 – 2″ x 4″ x 22 ½” wood
- 3 – 2″ x 4″ x 21″ wood
- 2 – 2″ x 4″ x 35″ wood – length may change depending on the garage door clearance
- 2 – 2″ x 4″ x 6″ wood – optional
1. Determine the distance
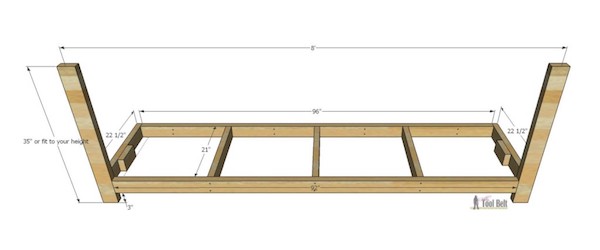
First, you’ll need to determine the distance between the highest movement of the garage door and the ceiling. For my garage, 35″ gave me plenty of space so the garage door would clear the shelving. This measurement will be the vertical support length.
2. Assemble the frame and shelf
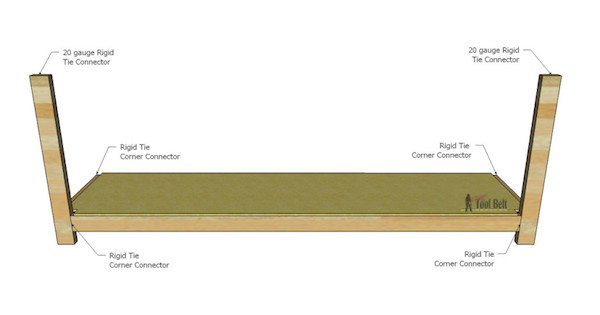
The shelf is assembled with Rigid Tie RTR connectors supporting the front of the shelf to the ceiling. The shelf frame is assembled with Rigid Tie RTC2Z corner connectors and secured to the garage wall through the back of the shelf.
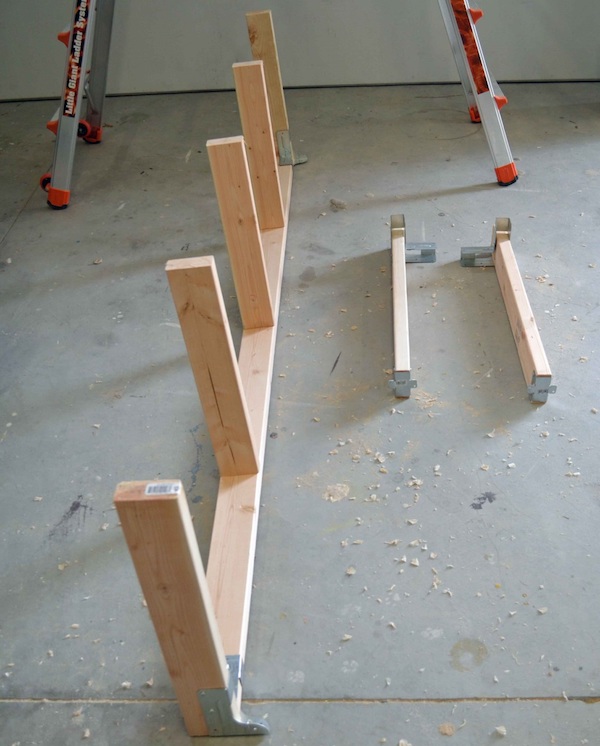
On top of the vertical supports, install a 20-gauge Rigid Tie connector and secure with SD8 screws. On the bottom, attach a Rigid Tie corner connector and secure with SD8 screws, making the bottom of the connector flush with the bottom of the board. Make the corner connectors mirror each other on the two vertical supports.
Install a Rigid Tie corner connector on the end of each 22 ½” boards, mirroring each other, and secure with SD8 screws. On the 2″ x 4″ x 96″ board, measure and mark 2′, 4′ and 6′. Attach a 21″ board at each location and secure with 2 ½” screws. Attach the corner connector to the respective ends of the 96″ board with SD8 screws.
3. Mount supports on ceiling beam
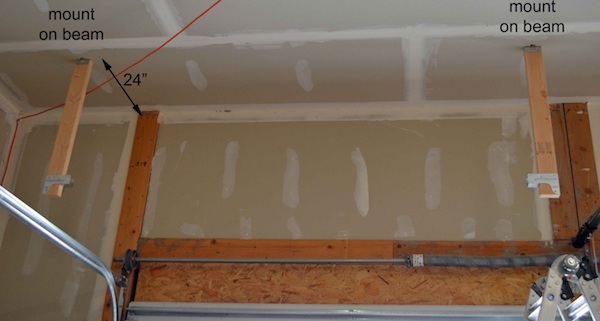
Locate the ceiling support beams. From the wall measure and mark over 24″. Install a vertical support 24″ from the wall, securing in place with 2 ½” screws into a ceiling support beam. If your beams are not visible, as in the photo below, be sure to use a stud finder. Install the second vertical support approximately 8′ from the first support in a support beam, again 24″ from the wall. Again, use a stud finder to ensure you are installing the screws into the center of the beam.
4. Lift shelf frame into place
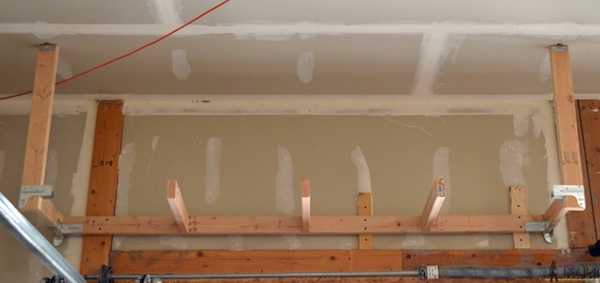
Lift the shelf frame into place, installing the sides into the corner connectors. Level and secure to the garage wall in the studs with 2 ½” screws. Secure the sides to the corner connectors with SD8 screws.
Install the 2″ x 4″ x 92″ board in the front, and secure to the front corner connectors with SD8 screws. Secure the 21″ boards to the front piece with 2 ½” screws.
5. Cut and place plywood
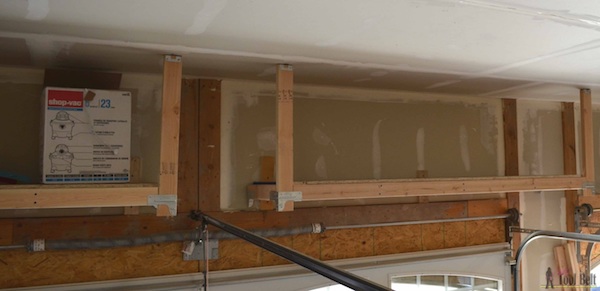
Cut a 4’x 8′ sheet of plywood in half the long way. Cut corner notches for the vertical supports.
Place on top of the shelf frame and secure with 1 ¼” brad nails or screws. The 2′ x 8′ plywood is just shy of overlapping on the side pieces. If your plywood needs support, add 2″ x 4″ blocks on the inside of the side pieces.
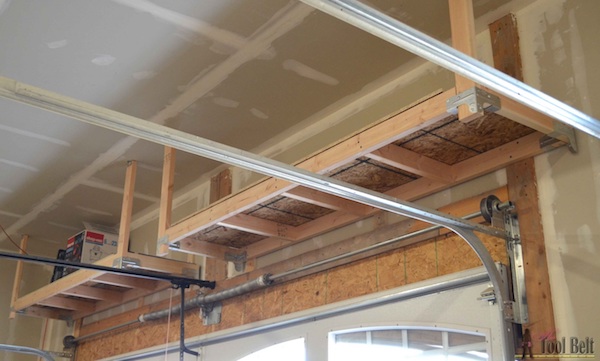
Enjoy your new garage storage space, I know I will!
OUTDOOR DIY PROJECTS
- How to Build a Cool, Modern Chicken Coop
- How to Build a Floating Deck
- How to Build a Outdoor Accents Pergola
- How to Build a Simple Rolling Planter


