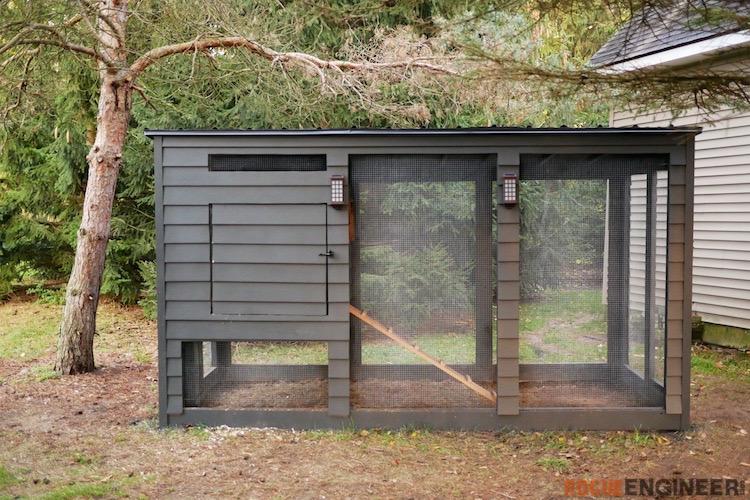
When I sat down to design these chicken coop plans, I knew that we wanted something awesome. We wanted to design a coop with clean, modern lines that had a simple yet great-looking exterior. This thing will be sitting in our yard all the time, so we knew just any old coop wouldn’t work. Jamie and I sat down to research chicken coop plans but nothing was exactly what we wanted. We didn’t want the standard look of boxes attached to boxes. We wanted everything housed in one single unit, under one roof.
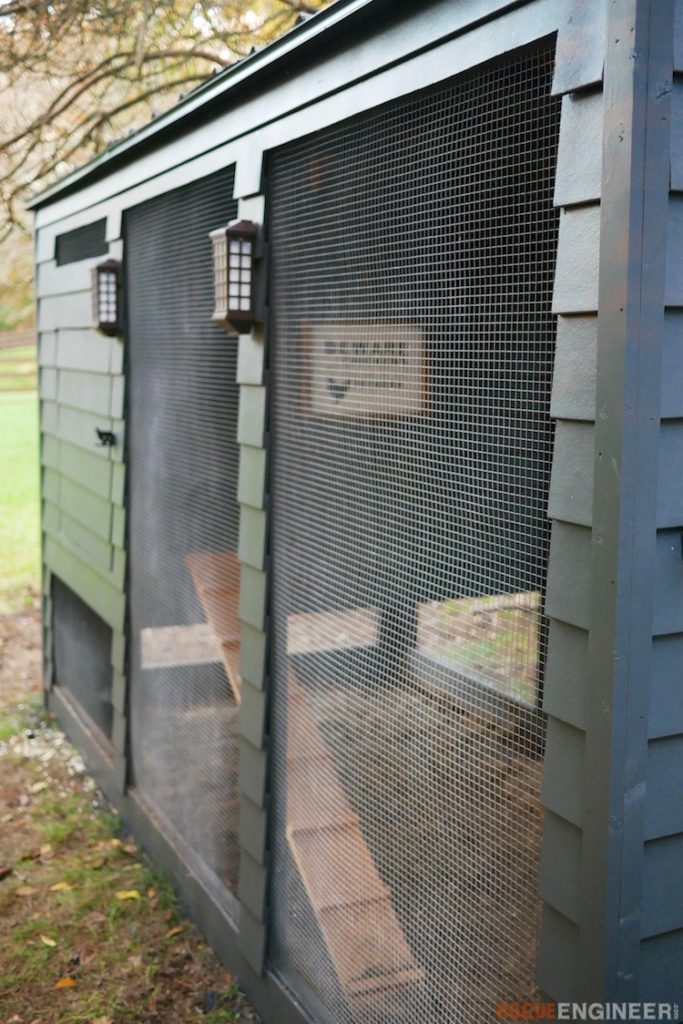
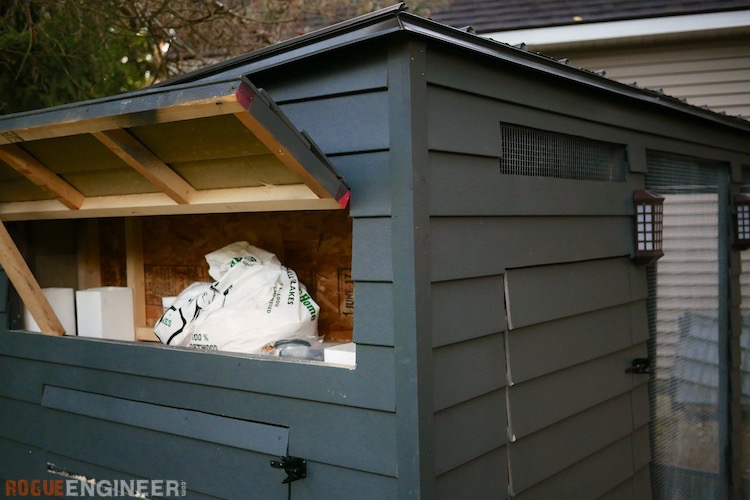
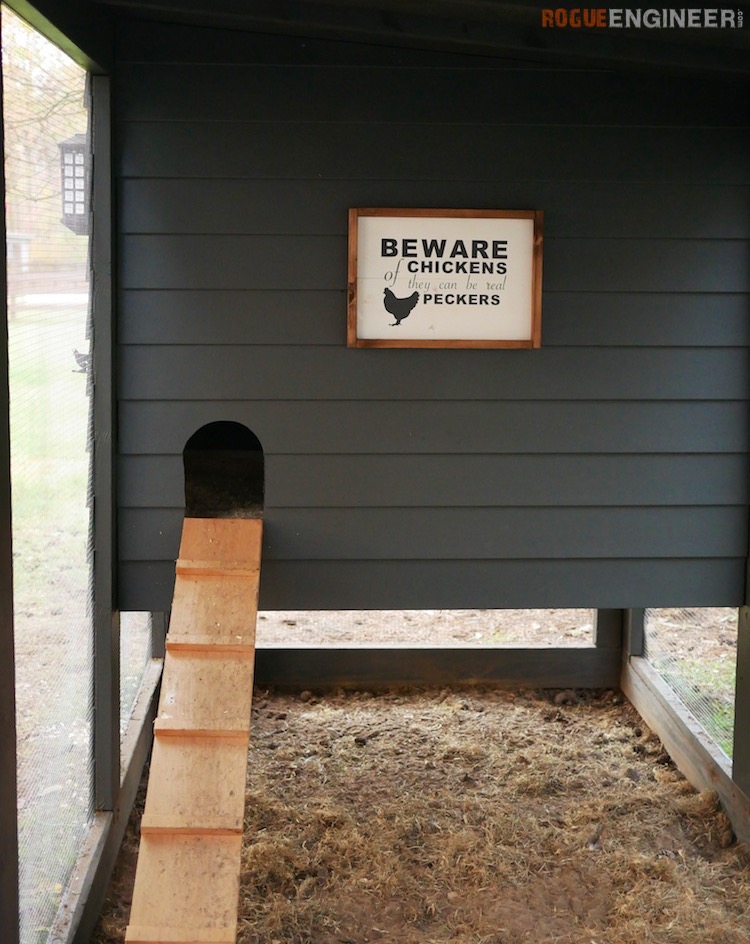
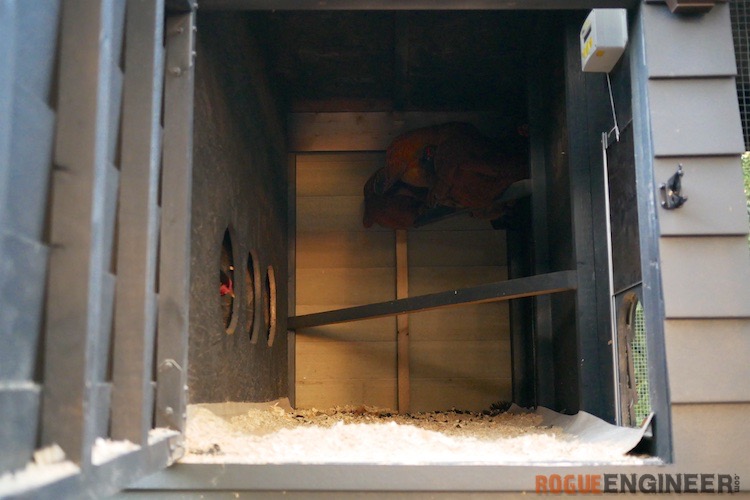
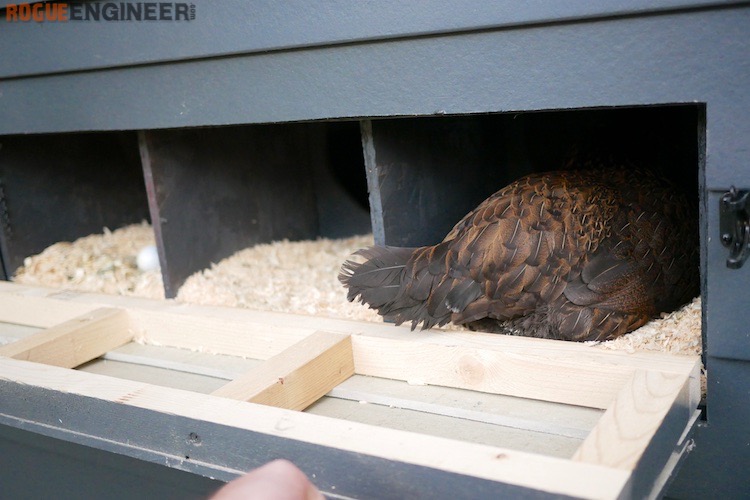
This coop is designed for up to six chickens. The run is 5′ x 12′, with the coop elevated above it to reduce the overall footprint. The run has a covered roof to reduce the impacts of our snowy winters and is tall enough for a person to stand up in and clean out as required. The coop has two roosts, three 12” x 12” nesting boxes and a full-size door for easy clean-out. The nesting boxes also have an access door on the side for easy access to those delicious eggs. Above the nesting boxes is a dry storage compartment for food and wood shavings. The sides of the storage compartment are open to the run below and this is to allow for future large-capacity feeders and waterers to be installed and covered from the elements.
As you can see the lookin at the photos and the chicken coop plans, every inch of this coop was well thought out and I think we will have not only the best-looking coop on the block, but also some happy chickens and plenty of eggs for years to come!
If you are interested in other project plans we’ve put together, please check out our website at rogueengineer.com, where we post lots of furniture plans and home-improvement tutorials.

Dimensions
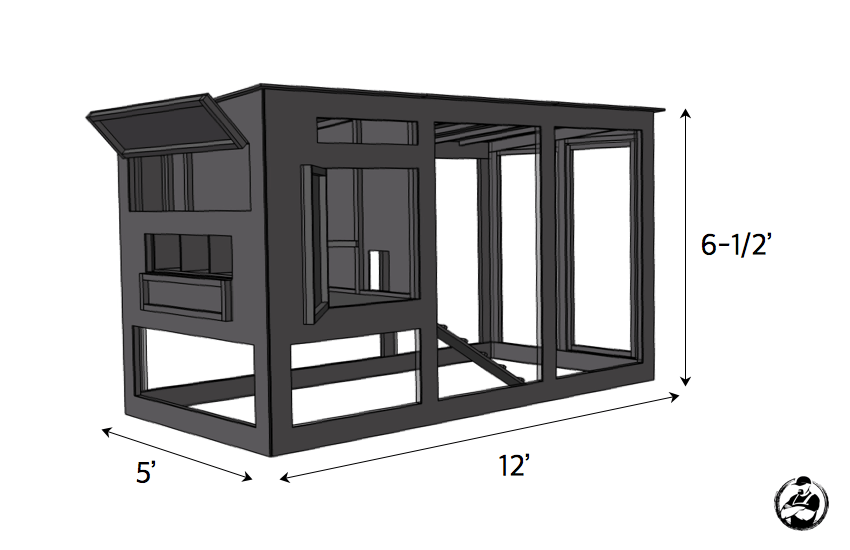
Download plans for Rogue Engineer’s DIY Modern Chicken Coop Plans (pdf)
Required Tools
- Drill/driver
- Circular saw
- Miter saw
- Brad nailer
- Hammer
- Coil nailer (optional)
- Tin snips
- Stapler
- Tape measure
- Pencil
- Safety glasses
- Hearing protection
Materials
- (3) 2 x 6 x 12′ treated lumber
- (6) 2 x 6 x 12′ untreated lumber
- (32) 2 x 2 x 8′ untreated lumber
- (9) 2 x 4 x 8′ untreated lumber
- 1 x 8 x 6′ cedar board
- (5) 1/2″ x 4′ x 8′ OSB
- (16) FB26 fence brackets
- (12) FB24Z fence brackets
- (32) A21 angles
- (8) RTA2Z Rigid Tie® connectors
- 3/8″ roofing staples
- 12′ drip edge
- Roofing felt
- Roofing 12′ wide x 6′ long
- Siding as desired (we used 30 @ 6 1/4″ x 12′ cement board)
- (4) 1 x 4 x 6′ common board for corner trim if desired
- (2) 1/2″ x 4′ x 25′ hardware cloth
- (10) exterior hinges
- (2) 2 1/2″ Strong-Drive® SDWS Framing screws (75 ct.)
- 1 1/4″ Deck-Drive™ DSV Wood screws (1 lb.)
- #9 x 1 1/2″ Strong-Drive SD Connector screws (500 ct.)
- Used on all brackets, angles and connectors that will not be within door openings or covered by siding; used also for all RTA connectors
- 8d x 1 1/2″ Strong-Drive Connector nails (1 lb.)
- Used on all brackets, angles and connectors within door openings or to be covered by siding
How to Build a Modern Chicken Coop
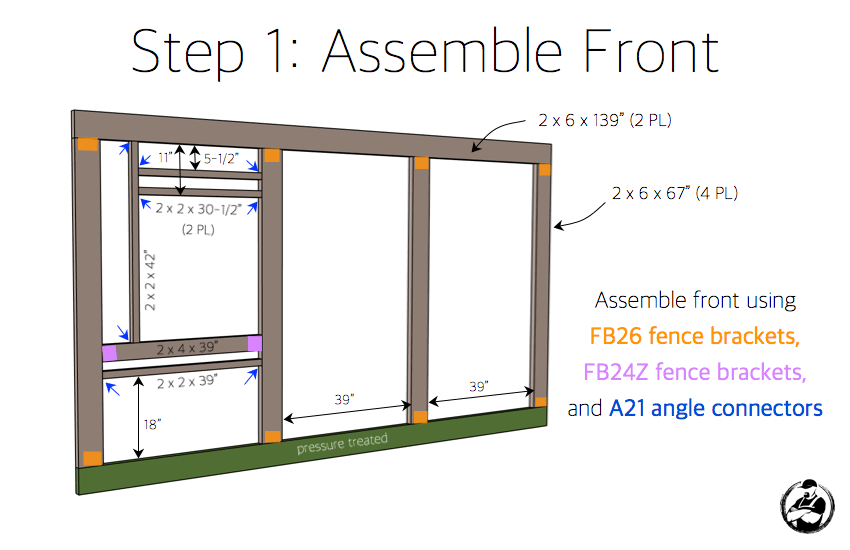
- Assemble front
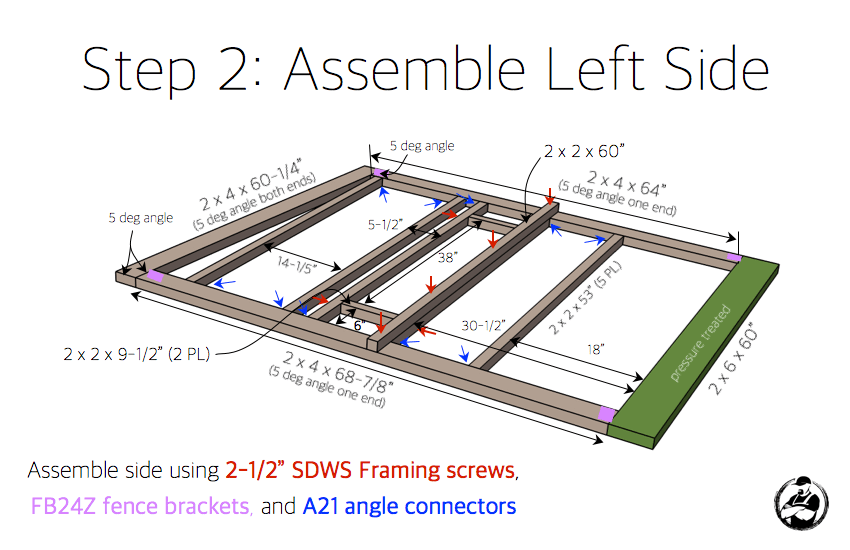
- Assemble left side
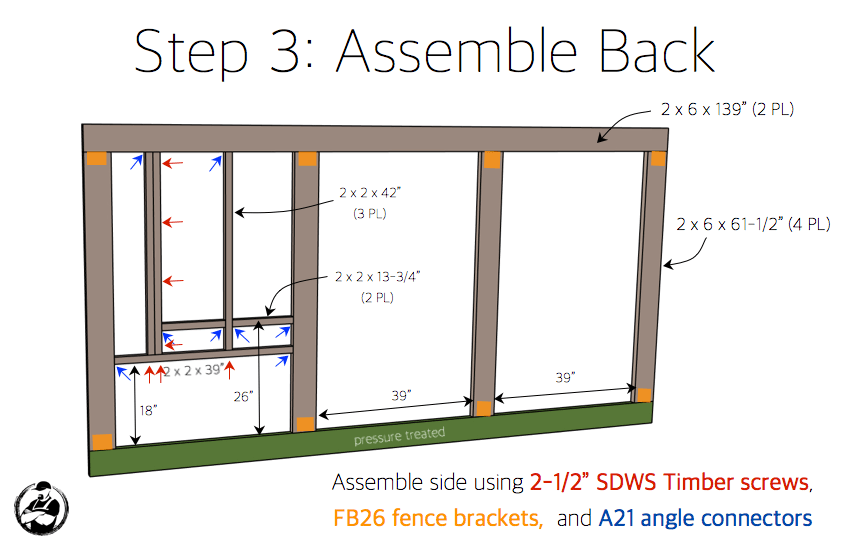
- Assemble back
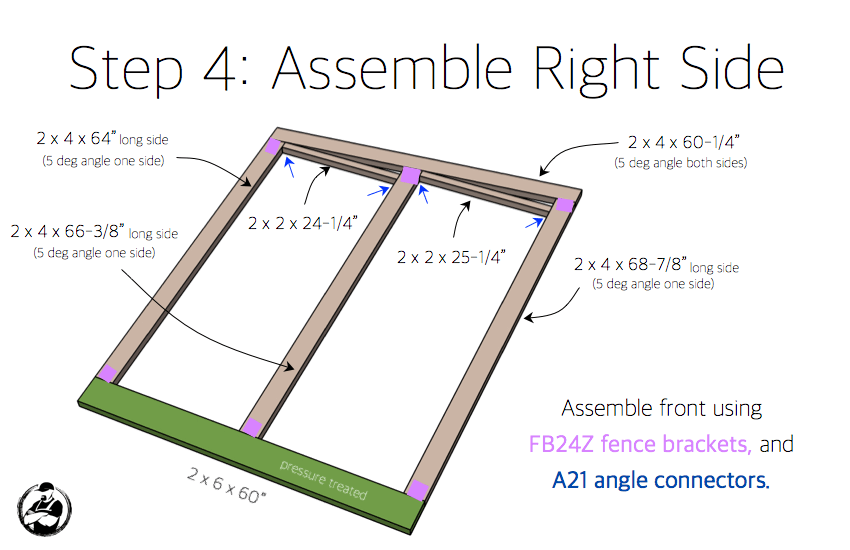
- Assemble right side
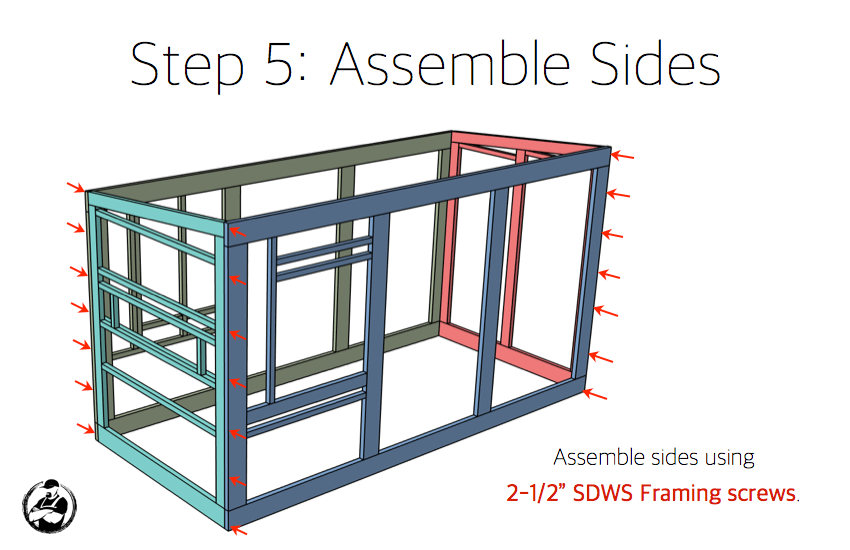
- Assemble sides
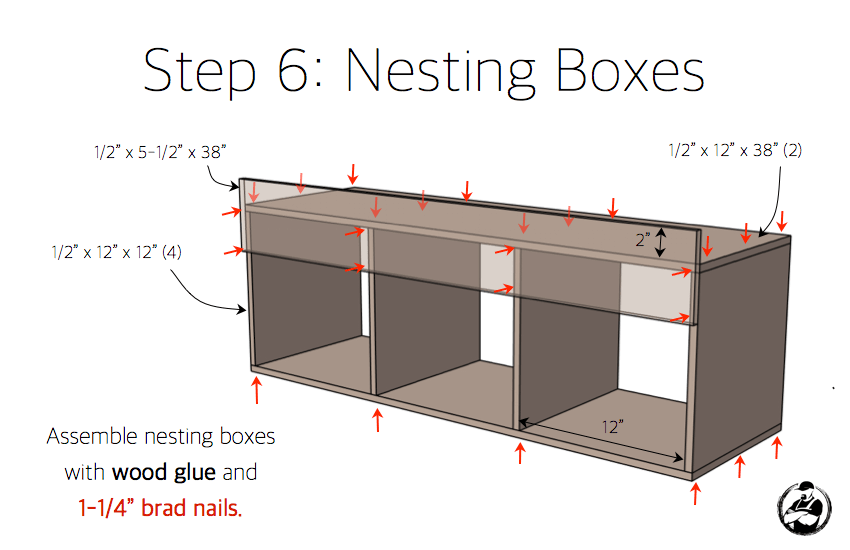
- Nesting boxes
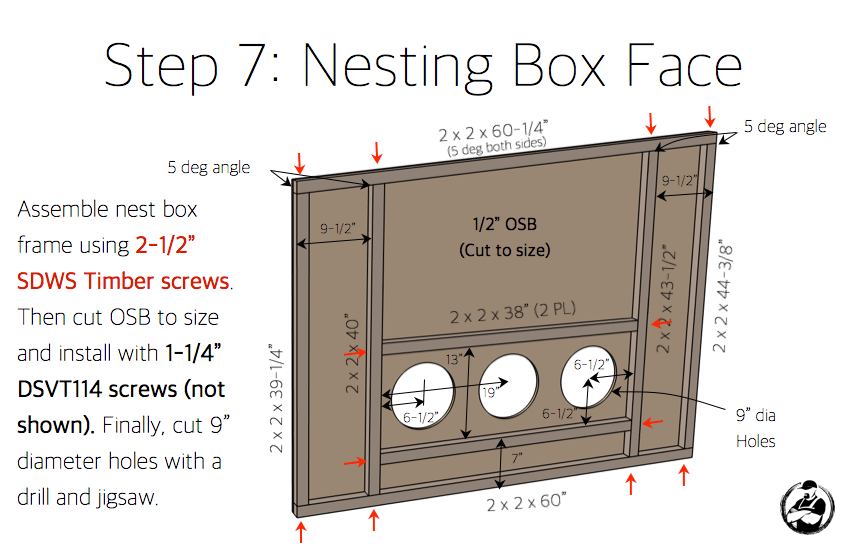
- Nesting box face
- Install nesting boxes
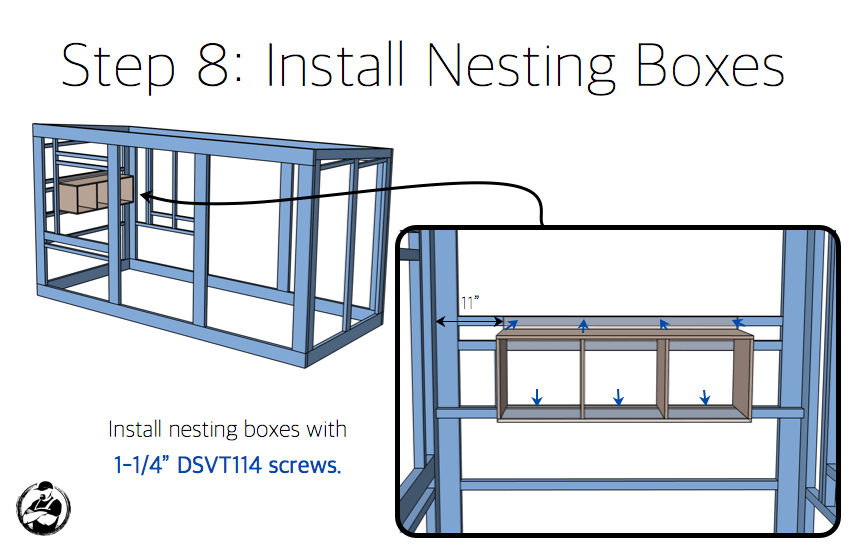
- Install nesting box face
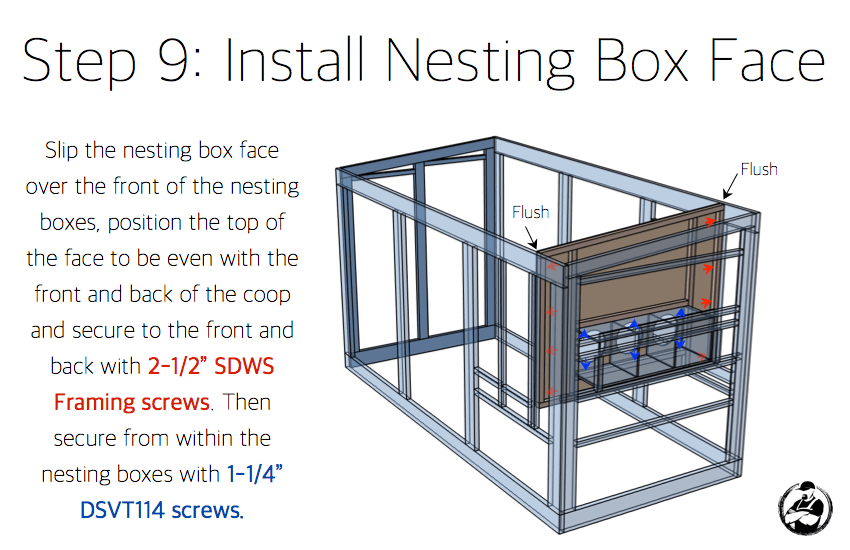
- Assemble coop side
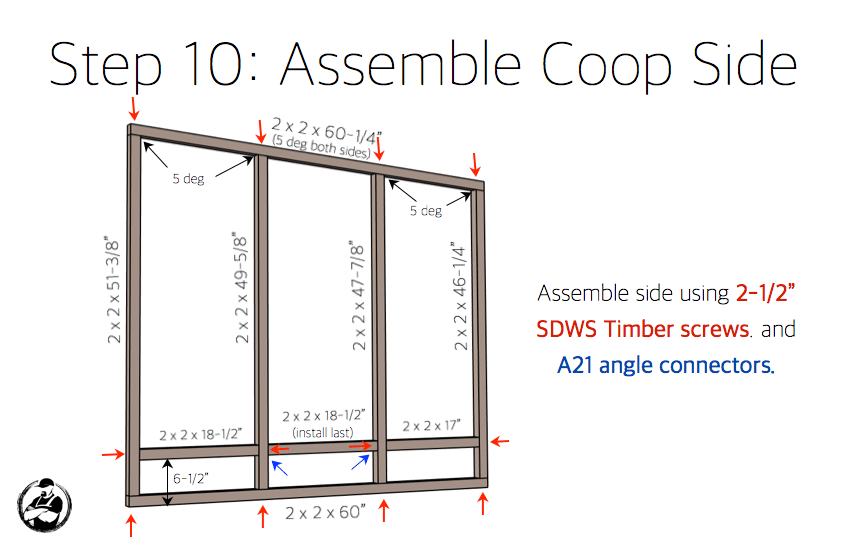
- Install coop side
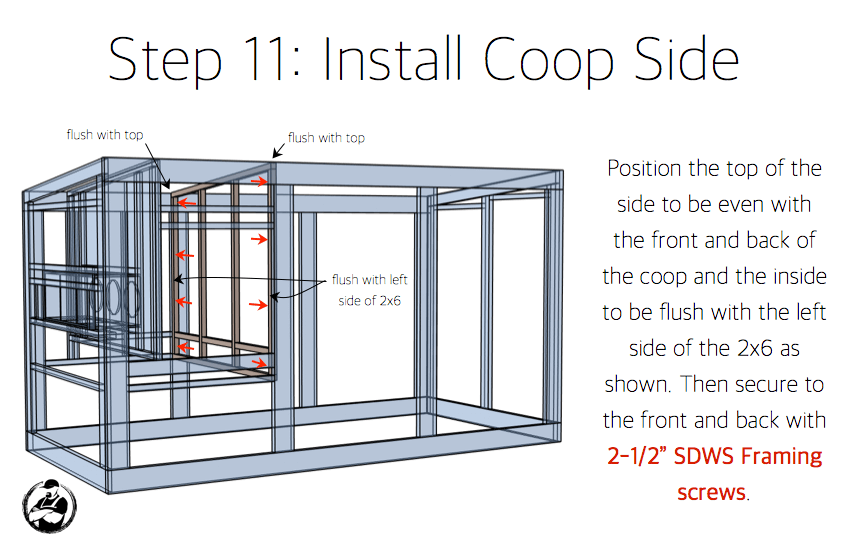
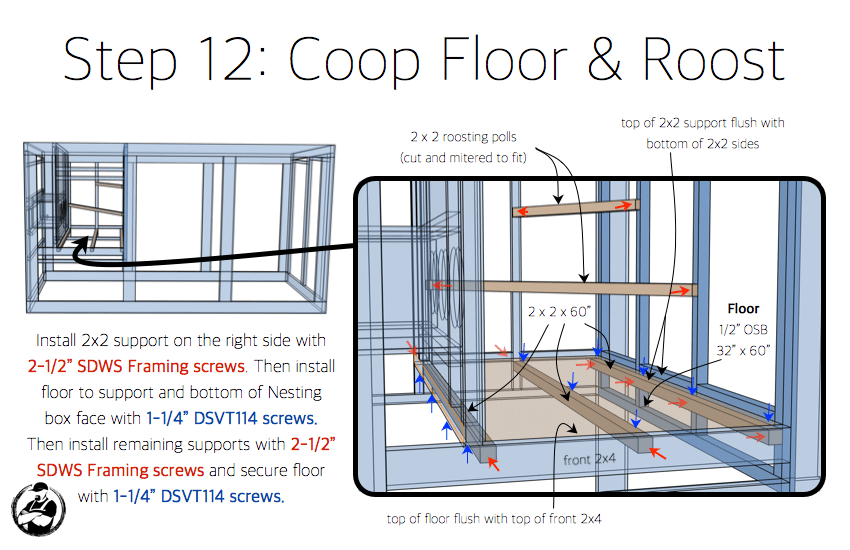
- Coop floor & roost
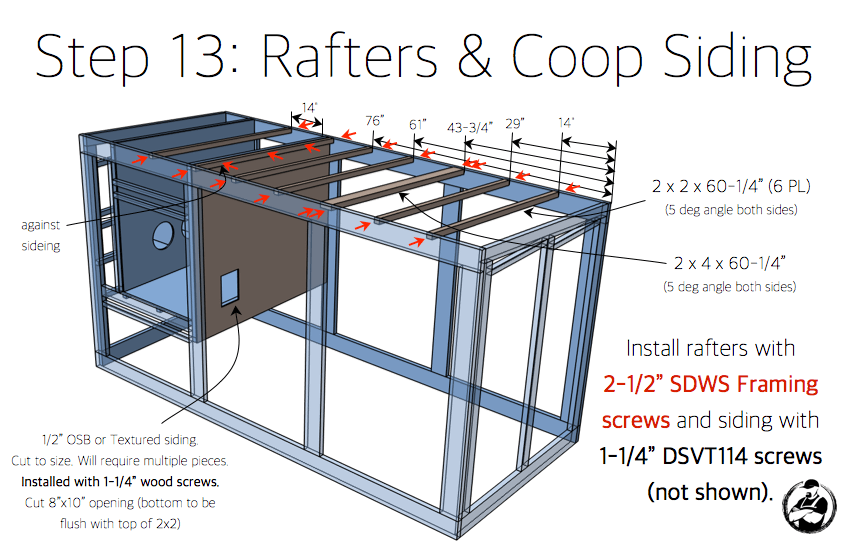
- Rafters & coop siding
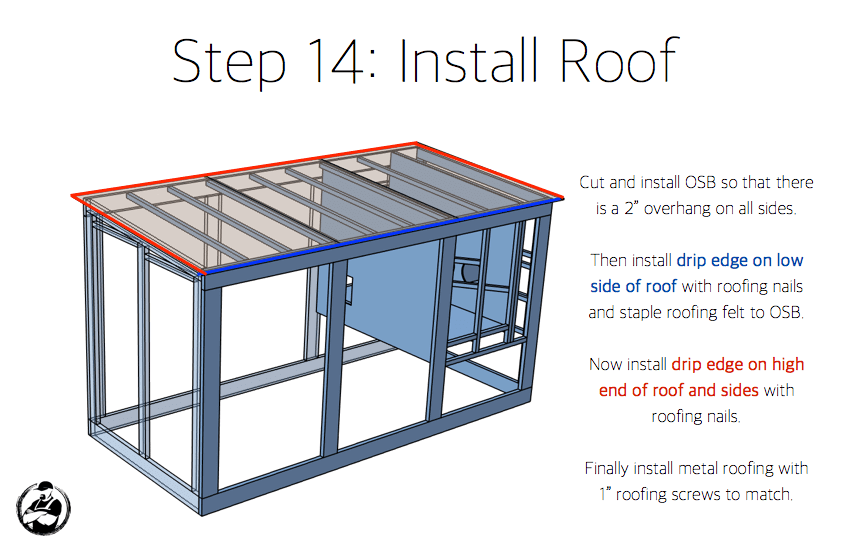
- Install roof
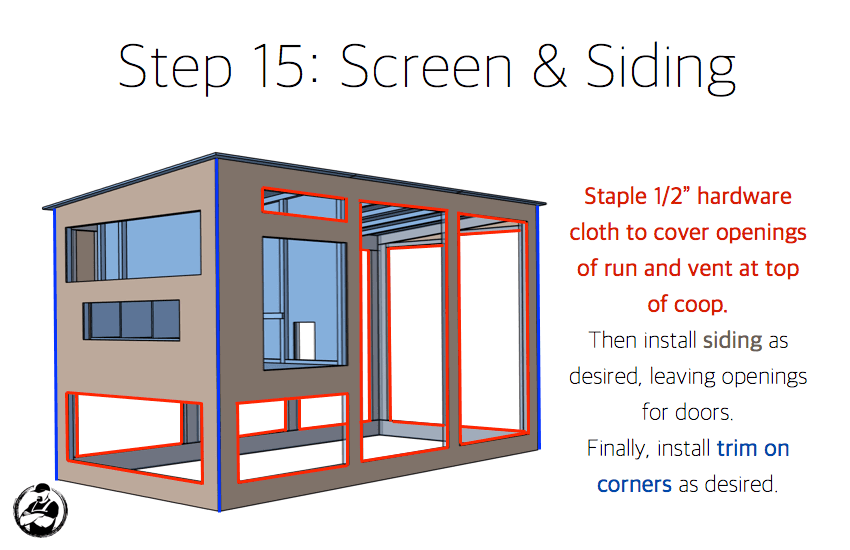
- Screen and Siding
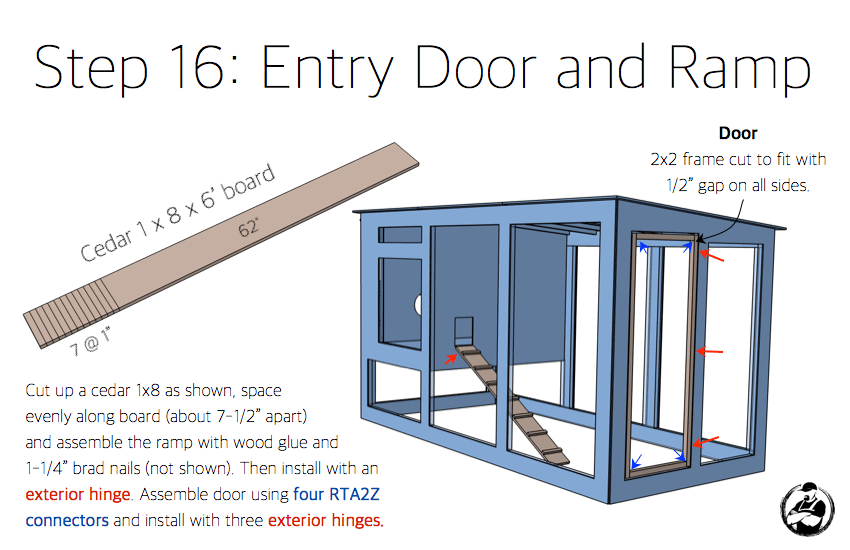
- Entry door and ramp
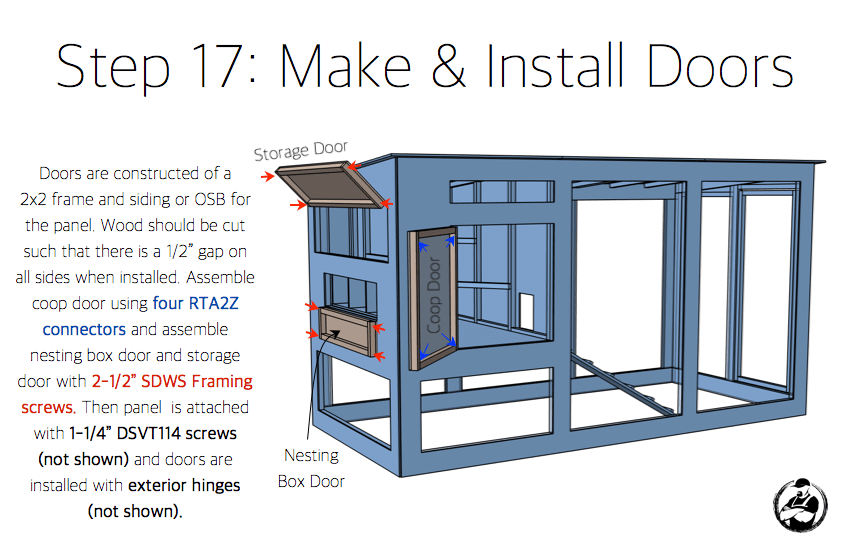
- Make and install doors
- Insert chickens! Thank you for checking out our free chicken coop plans. We’d love to see your finished project.
OUTDOOR DIY PROJECTS
- How to Build a Cool, Modern Chicken Coop
- How to Build a Floating Deck
- How to Build a Outdoor Accents Pergola
- How to Build a Simple Rolling Planter
INDOOR DIY PROJECTS
- How to Build a Leaning Bathroom Shelf
- How to Build a Stylish Bar Cart
- How to Build a Candle Wall Sconce Using Pipe Grip Ties
- How to Make Barn Door Window Coverings
- How to Build a Garage Wall Storage System
- How to Build a Ceiling Suspended Garage Storage System
