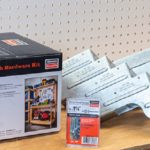
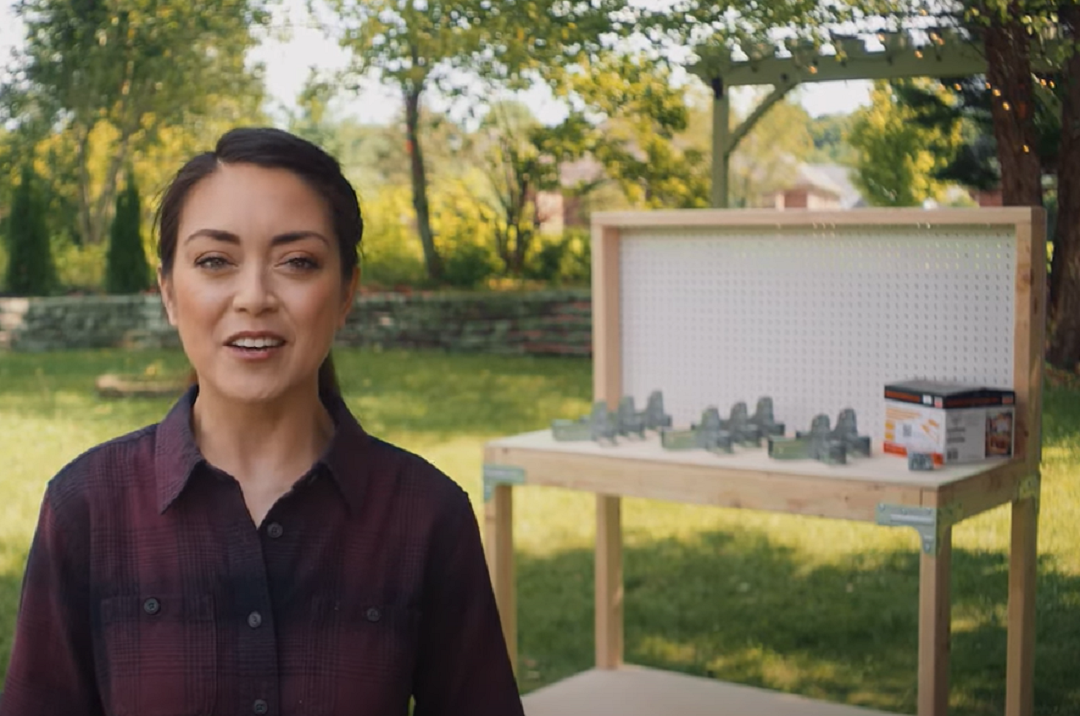
We challenged 10 DIY influencers to customize the Simpson Strong-Tie Workbench or Shelving Kit. This kit provides the connectors and connector fasteners to build a workbench or shelving unit. The kit features the Simpson Strong-Tie® Rigid Tie® RTC2Z corner connector which makes it easier to form strong, durable corner connections. See how these influencers took their creativity to the next level and discover the custom touches they put on their WBSK builds.
Jen Woodhouse led this challenge by building a classic workbench following the project plan instructions she downloaded from the QR code on the WBSK box. She even made a tutorial showing step–by–step instructions on how to build your very own workbench. Check out her How to Build a WBSK Workbench video to learn more.
#WBSK Challenge
Congratulations to Mandy aka @houseonmillandhill for winning our WBSK Challenge! She did an amazing job turning our versatile workbench and shelving kit into an outdoor cooler serving station.
Regarding her win, Mandy says “Thank you so much Simpson Strong-Tie for letting me be apart of your WBSK Challenge! I had so much fun building my project. The kit is so versatile that there really is no limit to what you can build with it. I can’t wait to use my cooler serving station this summer and I’m looking forward to some upcoming projects I have planned this year using Simpson Strong-Tie products! There’s just so many possibilities. Thank you again!”
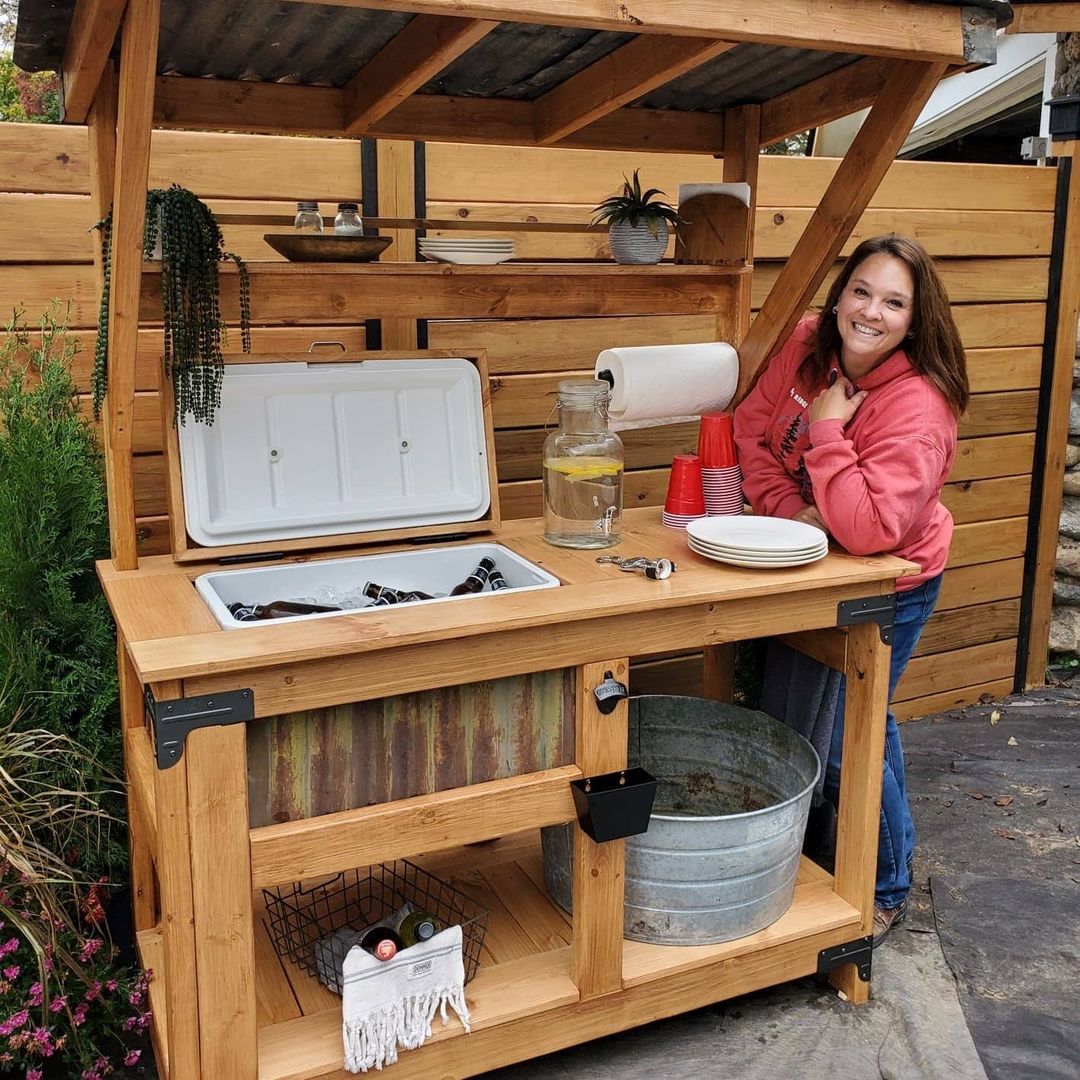
Influencer: Mandy Furrow
Instagram: houseonmillandhill
What an absolutely fun DIY project this was! I, along with a few other DIYers, was asked to complete a workbench challenge. I thought what a great way to add something useful to the outdoor area we are developing. So, I made my kit into an outdoor cooler serving station, because, let’s all be honest, in Michigan we live for our summers. The kit comes with brackets and screws. I added exterior screws since my bench would be outdoors. The instructions on building the bench are pretty simple. I did make mine larger than the instructions called for and added a lot to it, including the roof. I have been known to hoard wood, so I had plenty around. The old tin came off our garage roof that we redid. I stained and sealed all my wood so it would hold up to our Michigan weather. I’m pretty happy with how it turned out and can’t wait to use it next summer.
Influencer: Joana Bianchi
Instagram: joana_bianchi
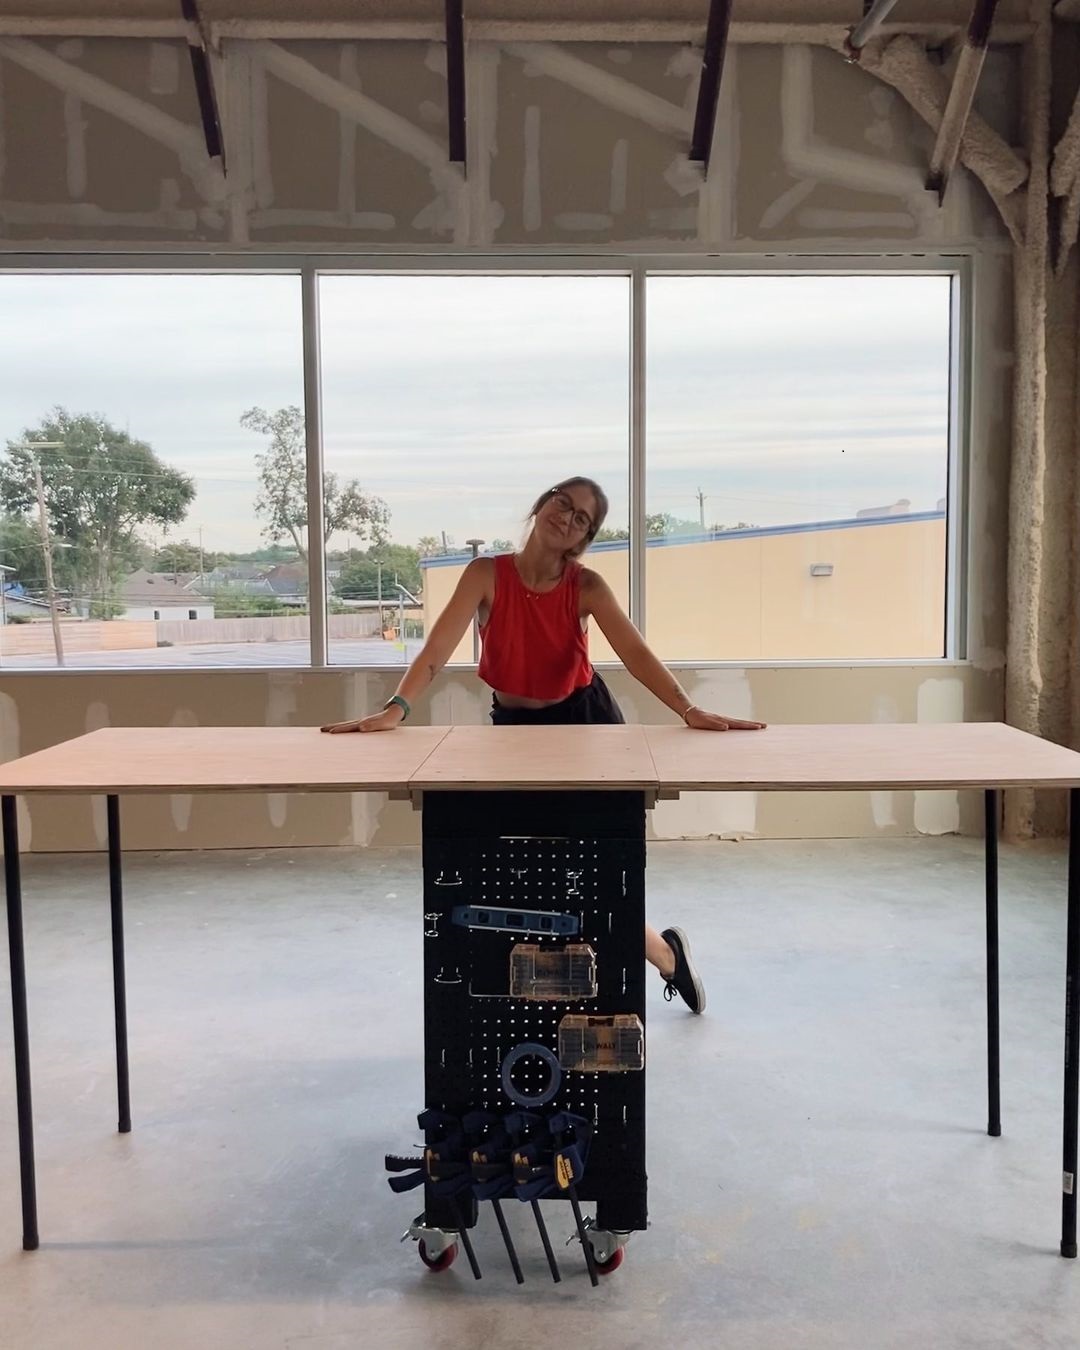
As soon as the WBSK kit arrived, I already had the plan laid out: I was going to make a super functional bench, as full of storage as I like, but one that I could also easily transport to different places. I added these folding flaps on both sides, a storage panel and magnetic tool rails. The legs, as they are metallic, are trapped in the magnetic rails when the bench is closed. All the storage boxes fit on the shelves inside the countertop, so you can store everything in a small space. Finally, I also put wheels (with brakes) for easy transport and some knockers to hold the flaps when closed, to make it a more solid piece and easier to lift.
Influencer: Yamilec Branch
Instagram: thegroundedhome
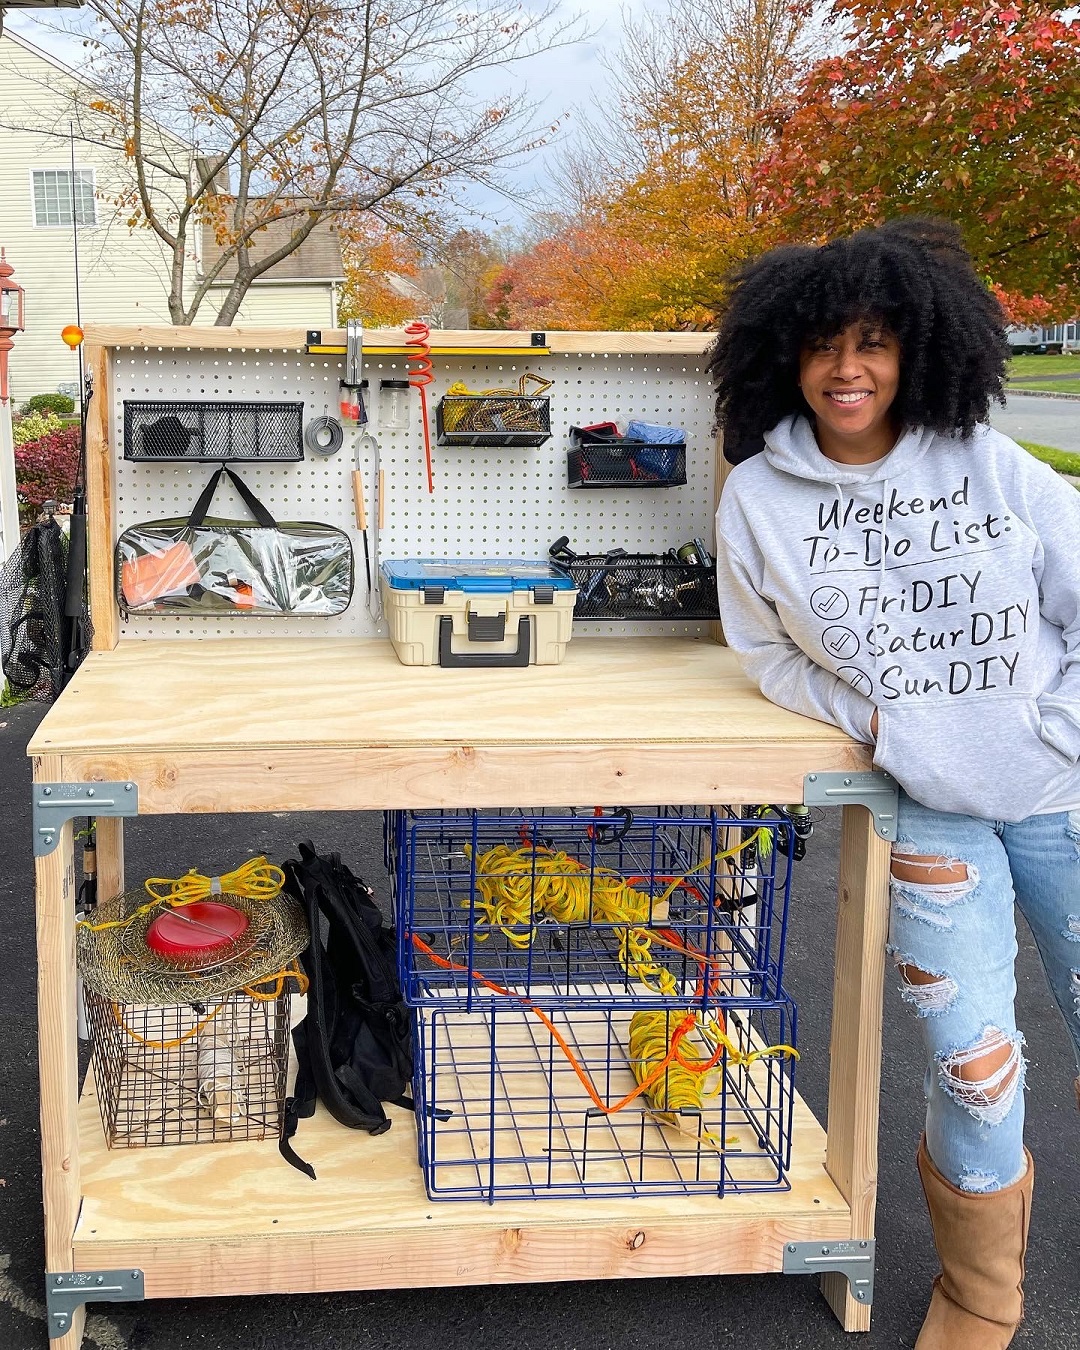
I decided it would be a perfect place to set up my husband’s fishing gear and give him a place to set his lines up. I added PVC pipe to the bottom to hold his reels (screwed straight in and the reel is resting on the screw) as well as cup hooks to the top to keep it nice and straight. I also added a magnetic bar to hold all his metal bits and bobs and more cup hooks on the sides to hold his net and whatever else he wants to hang. The build took all of two hours and that is with some breaks added in. You can find this kit at any box store and get it done with a drill and saw. To save time, I purchased two 2×4 plywood panels. Thanks for including me in this fun workbench challenge!

Influencer: Miles Swaim
Instagram: swaim_creations
For my workbench I decided to make a butcher block top using a glue–up method with all– reclaimed wood. I built two frames using the Strong-Tie brackets that were painted flat black with Behr Paint and Primer. I then connected the two frames in the middle with enough room to place my miter saw. Once the frame was built, I used reclaimed fence panels and ripped about 175 2″ strips. I then glued the strips together face to face to create a 2″ butcher block style tabletop for each side of the frame. After trimming the glue–up blocks to fit the frame, I used epoxy to fill some of the gaps and holes as well as to help with overall durability. The remaining process was mostly epoxy, planing, sanding, repeat, until it was to my satisfaction. I also used a small version of the glue–up for the base of the miter saw. The shelves on the workbench are just reclaimed fence panels cut to size and nailed down. I had so much fun with this DIY project. I could have really used a workbench when making this workbench!
Influencer: Sandy Wozniak
Instagram: crzylilkhmer
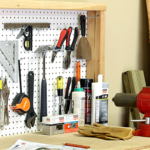
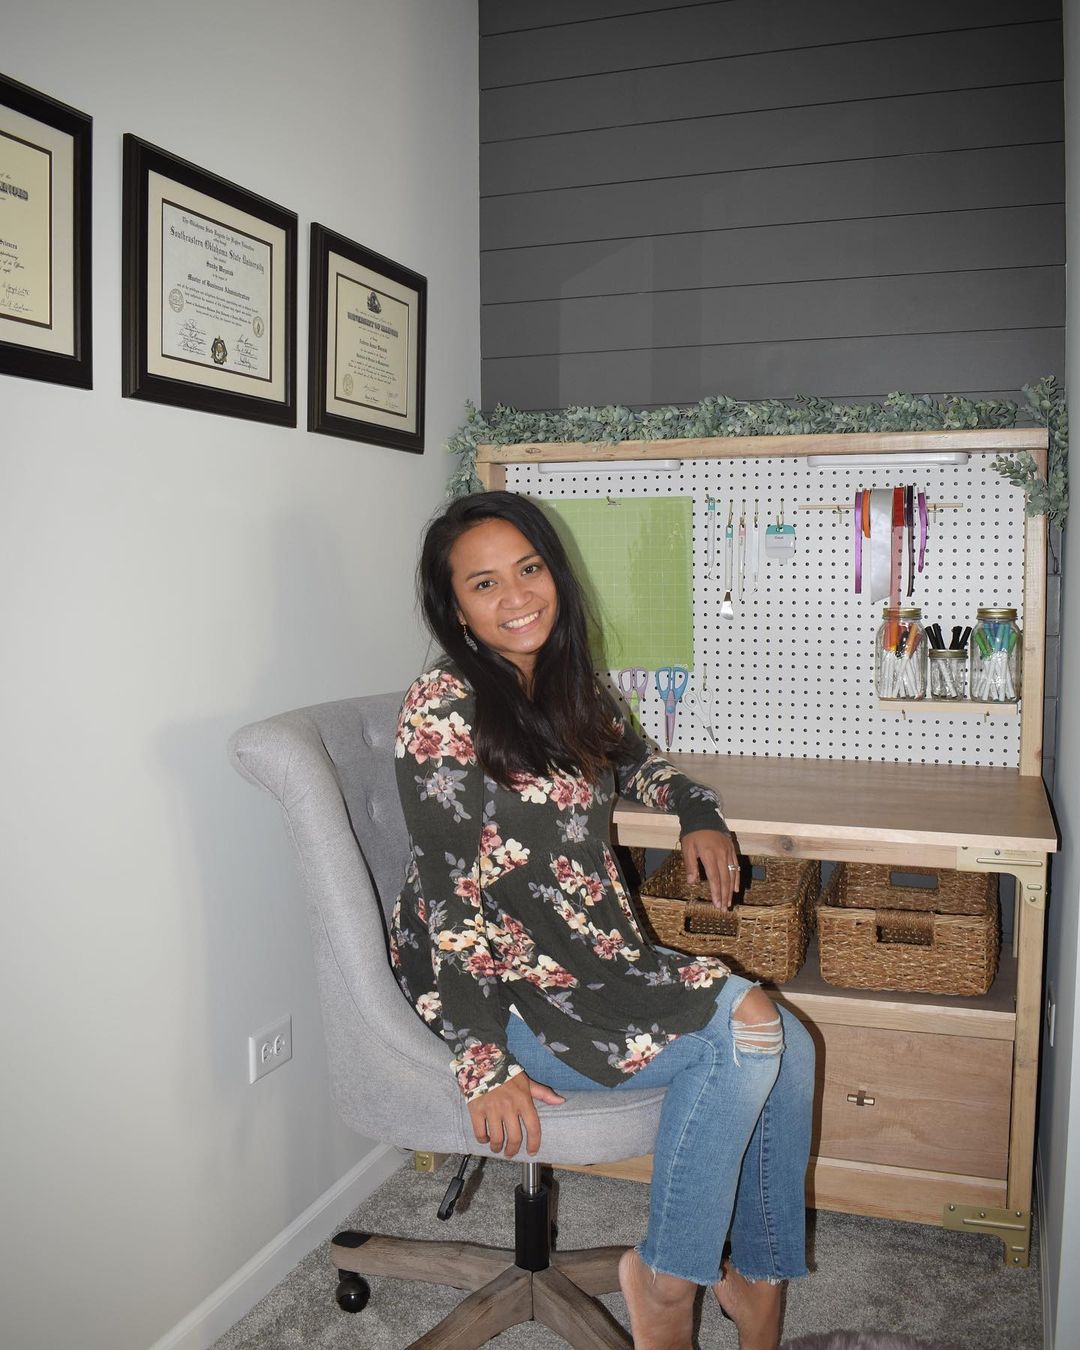
I was one of a handful of DIY friends who were challenged to use the Strong-Tie workbench kit to create a workbench of our own. I already had an outdoor tool workbench but knew I could use this kit for my indoor craft space instead. This workbench kit is so versatile for any space, indoor or outdoor. I truly challenged myself when I made this. I made this workbench match my home by spray–painting the connectors that came in the kit gold, whitewashing and staining all the wood pieces and even creating a drawer for my printer and a 90-degree door hinge specifically to fit my Cricut machine. I am seriously in love with my new craft workbench!
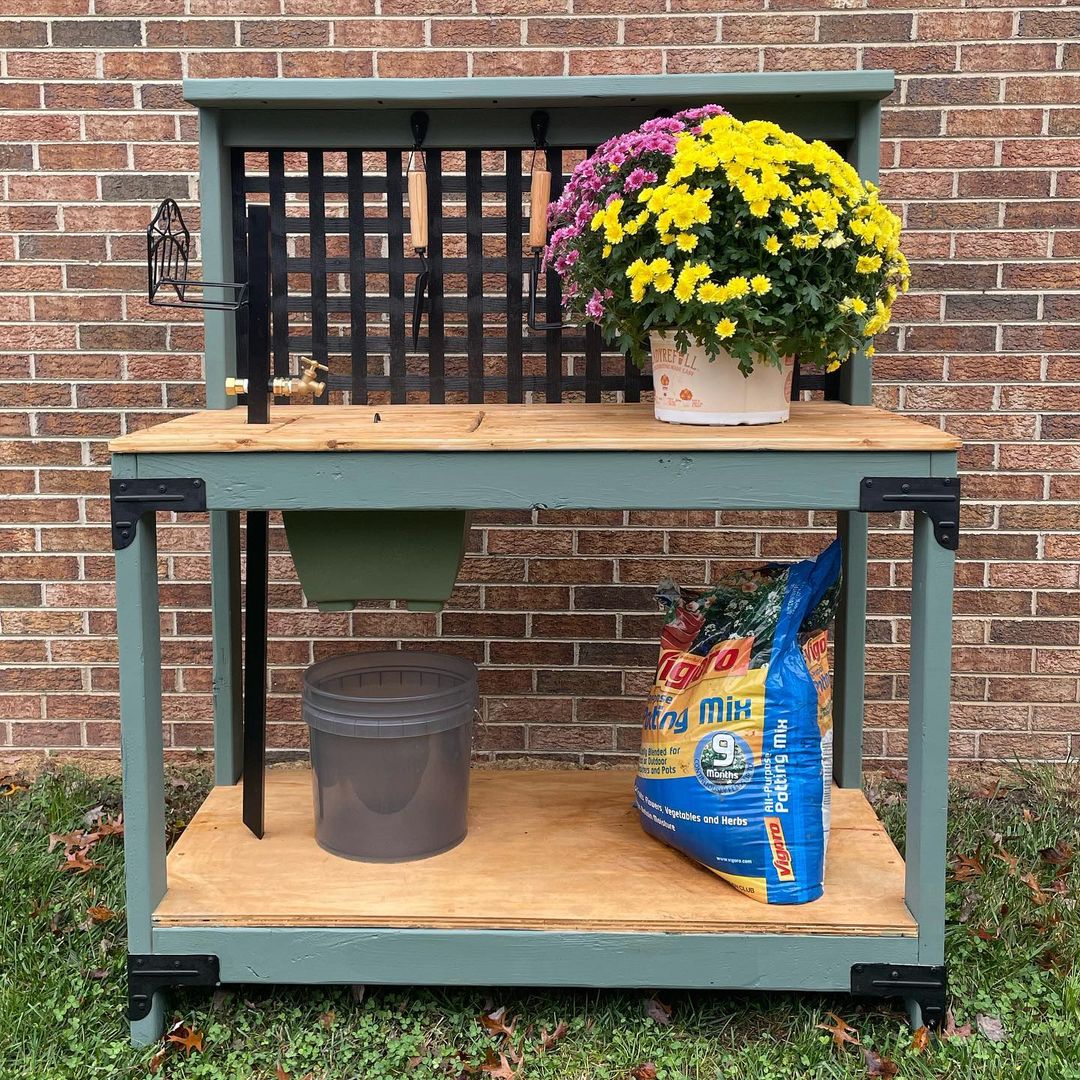
Influencer: Tamisha Porter
Instagram: toolboxdivas
How many ways can you customize the WBSK Workbench kit? Well, the answer is endless. There are limitless possibilities for what you can do. Truthfully, I did not need another workbench. But I desperately needed a place in my garden to repot plants and store garden accessories. This kit was the perfect solution. I made an awesome potting bench with a garden sink. How cool is that!? This will definitely make winter gardening a lot more manageable.
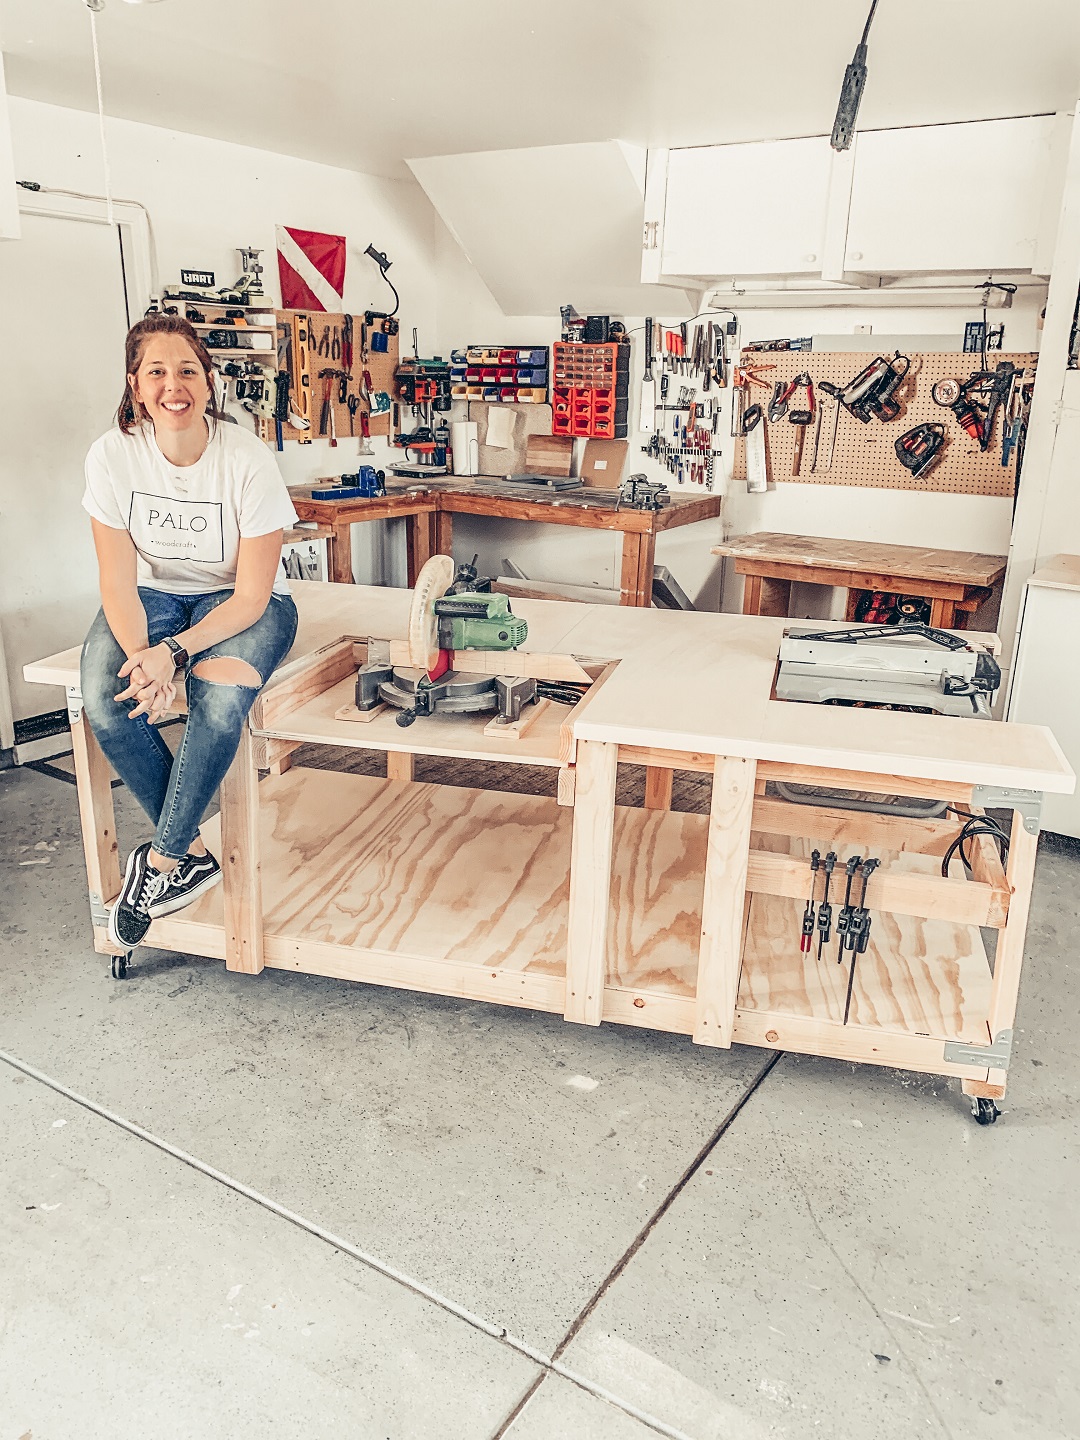
Influencer: Jenny Palo
Instagram: palo_woodcraft
Well, here it is! My dream workbench! 4’ x 8’ of workspace and storage! Now that I’ve taken pictures, I’m ready to cover this workbench in sawdust! For this workbench, I was gifted a Simpson Strong-Tie WBSK workbench kit, which includes L-bracket hardware and self-driving screws (a literal life-saver!). The hardware was so easy to use, just add 2x4s!
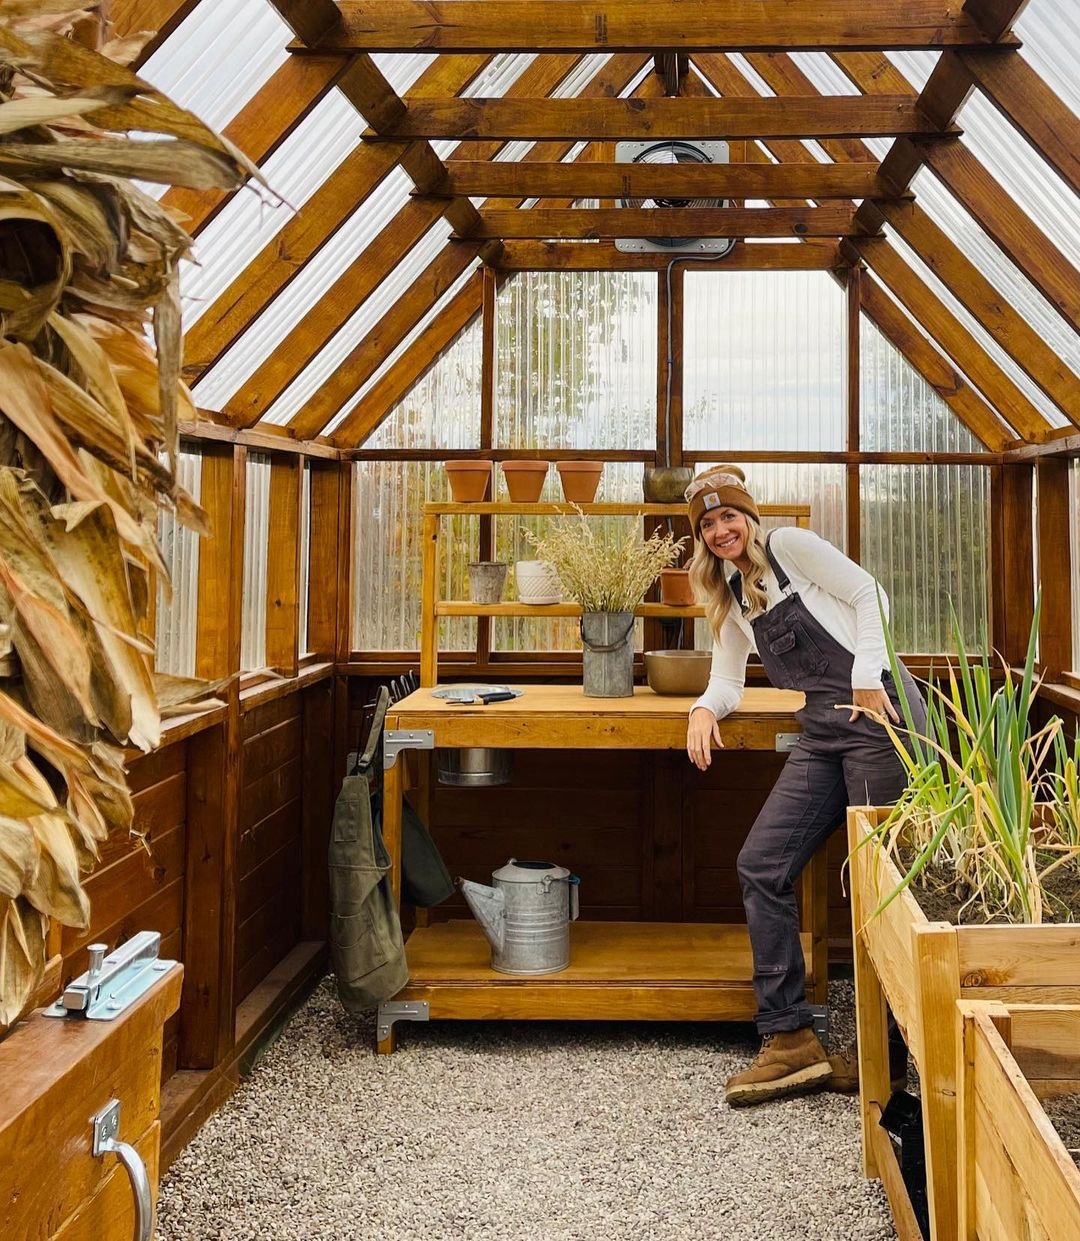
Influencer: Dena Breitmeyer
Instagram: fletchercreekcottage
I’m so happy with how easy this project was to assemble and with how my potting bench turned out! As soon as I saw the kit, I knew it would be super-easy to build a potting bench for the greenhouse. The kit was so easy to assemble and it’s completely customizable! To turn the Simpson Strong-Tie Workbench Kit into a potting table for my greenhouse, I made a few simple changes. I followed the instructions step by step, building the bench just as the instructions listed for the main part of the bench. When it was time to add the pegboard to the back, I decided to leave it off. The potting bench was going in my greenhouse, so I needed the sunlight to be able to shine through. If I had added the pegboard, it would have cast a shadow (and that’s not good in a greenhouse). In place of the pegboard, I added a simple shelf. I measured halfway up the back frame and then used wood screws to secure another 2×4 shelf. That gave me two 2×4 shelves to set my little pots and garden tools on.
The next modification I made was cutting out a circular hole on the workbench top just large enough to support a bucket, but not so large that the bucket would slide through. Before attaching the workbench top, I traced the perimeter of a galvanized bucket off to the left side of the plywood sheet, drilled a hole, and then used my jigsaw to cut a circle that was just slightly smaller than the circle I had traced. After I cut it out, I secured the workbench top (plywood) to the workbench and placed my bucket inside. The bucket will work great for discarding anything I trim off my flowers/veggies when I’m working in there. The bucket has a handle so I can easily carry it out and empty it whenever it’s full. The last thing I did to customize my workbench was to add four large metal hooks to the left and right sides of the bench. These hooks are perfect for hanging up all my spades, trowels, and garden accessories.
I couldn’t be happier with how this workbench/potting bench turned out. It’s been such a helpful and wonderful addition to my greenhouse!
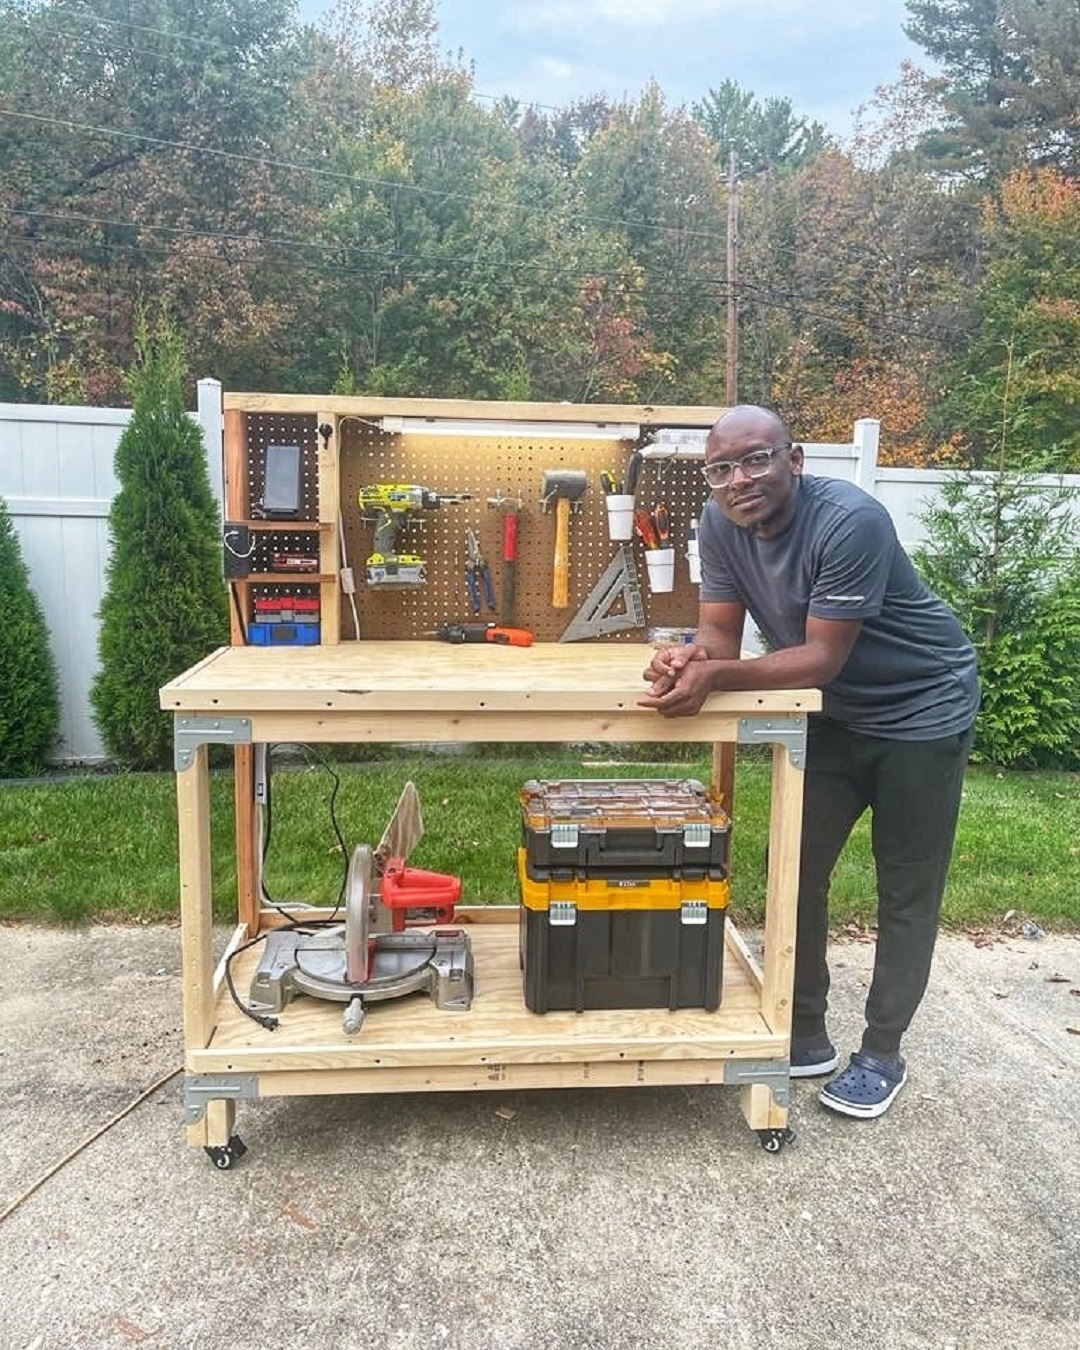
Influencer: Yinka Adebiyi
Instagram: adiydude
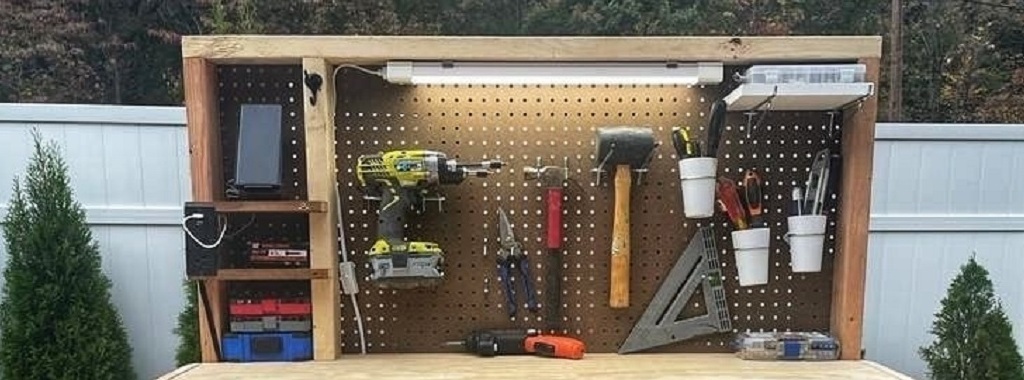
If it ain’t structurally tied with Simpson Strong-Tie, it ain’t strong enough. This was a fun project for me, as I got to add some personal touches to the workbench for ease of use and comfort. Some things I added included a wireless phone charger and a USB and power adapter outlet. I also put a headlight up top as well as added wheel casters to make the workbench mobile.
Thank you to everyone who participated in this WBSK challenge! We loved seeing everyone’s creative twist on the WBSK kit. If you have questions about the WBSK kit, check out our helpful FAQ that can answer your most commonly asked questions. If you’re ready to build your own workbench, find our free printable and downloadable plans here.