
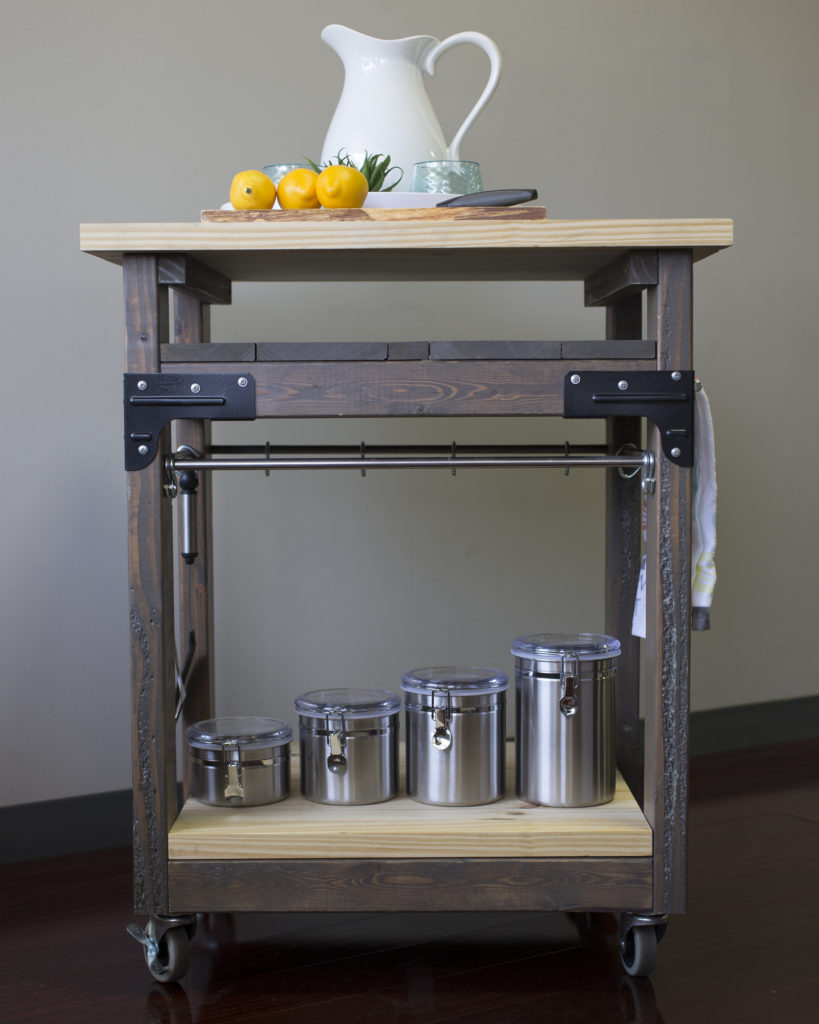
Jamie designed this DIY kitchen island on casters so it can be moved easily to anywhere prep space or extra storage is needed. With its mobility and versatile design, it can easily be used for entertaining purposes like a bar cart, too.
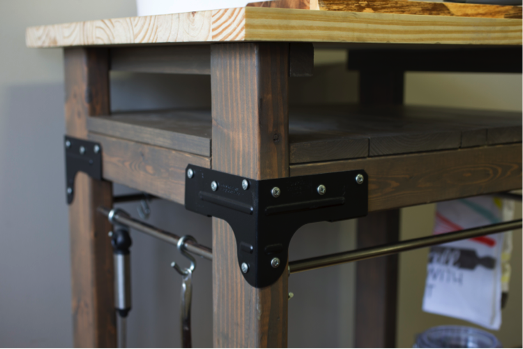
For this kitchen island, Jamie used RTC2Z connectors, which make this a project that even a beginner DIYer can complete from start to finish. Simpson Strong-Tie RTC2Z connectors allow DIYers to connect wood pieces in a rock-solid 90°angle quickly and easily. You can leave the connectors in the original ZMAX®finish for extra corrosion resistance, or you can paint them. We used Rust-Oleum Satin Black spray paint for this project.
The nice thing about this DIY kitchen island is that it’s easy to build, easy on the eyes and easy on your wallet.
Download the free mobile kitchen island plans here!
Tools You Need
- Power saw (hand or table)
- Power drill with Phillips bit
- Pencil
- Tape measure
- Speed square
- Clamps
- Sander or sandpaper
- 1/2″ drill bit
- Painter’s tape
- Rags for applying cutting block oil
- Nail gun or hammer
Lumber
- (2) pieces 1×6 x 8′
- (2) pieces 2×3 x 8′
- (1) piece 2×4 x 10′
- (1) piece 2×2 x 4′
- (1) piece 1⅛″-thick 2′ x 6′ plywood
Simpson Strong-Tie®Connectors and Fasteners
- (4) Rigid Tie®RTC2Z connectors
- (1) box Simpson Strong-Tie SD #8 x 1¼″ wafer-head screws
(for RTC2Z connectors) - (4) Simpson Strong-Tie A21 connectors
- (1) 1 lb. box 2″ Deck-Drive™ DSV Wood screws (DSVT2R1LB)
Other Materials
- (2) 36″ rolled steel tube ½″ in diameter
- (4) 3″ locking caster wheels
- (6) packs of ¼″ x 2″ S hooks (two per pack)
- (1) bottle of cutting block oil
- (1) small box of 2″ finish nails (to attach shelf pieces to rails)
- (1) small pack 1″ pan-head wood screws (for A21 connectors)
How to build a DIY Mobile Kitchen Island
Step 1: CUT LUMBER TO SIZE
Use straight cuts.
Step 2: ATTACH LEGS TO CONNECTORS
Attach RTC2Z connector 5″ down from the top of each leg (A) with SD8 screws. Position legs so their wider sides face each other.
Step 3: INSTALL HANGER ROD
Using a 1⁄2″ drill bit, create holes 9″ from the top of each leg and 1″ from the outside of the island. Insert metal rod and place S hooks in preferred orientation (facing in or out).
Step 4: ATTACH RAILS AND CASTERS
Attach upper front rail (B), upper back rail (C) and upper side rails (D) to RTC2Z connectors with SD8 wafer- head screws. Attach lower front rail (B), lower back rail (C) and lower side rails (E) to legs with (16) 2″ Deck-DriveTM DSV Wood screws. After lower front and back rails are attached to lower side rails (E), install rolling casters to side rails, front and back rails and legs with 2″ DSV screws. Use two screws per leg and one screw for the back rail and side rail.
Step 5: ATTACH UPPER SHELF
Assemble widths of 1×6 lumber pieces sufficient to form the 24″ (wide) x 20″ (long) upper shelf (F). Begin at ends, notching end pieces to fit around legs. Measure gap in middle of shelf, and cut center piece to fill it. Hammer 2″ finish nails through shelf pieces into supporting rails.
Step 6: ATTACH TOP SHELF
Attach the top shelf (G) by centering the shelf over the island to ensure overhang is equal on opposites sides. Slide 2×2 x 20″ (I) top attachment to insides of leg and clamp to top. Repeat for the other side. Flip island over and screw wood to the top with 2″ DSV screws.
Step 7: ATTACH BOTTOM SHELF
Clamp bottom shelf (H) to bottom rails. Turn island over and place
A21 connectors midway along each bottom rail. For each connector, screw two 1″ pan-head wood screws into rail and two more into bottom of shelf.
Note: installation is easier if wood staining and painting of RTC2Z is done before assembly.
Find more do-it-yourself project plans at strongtie.com/diy.


