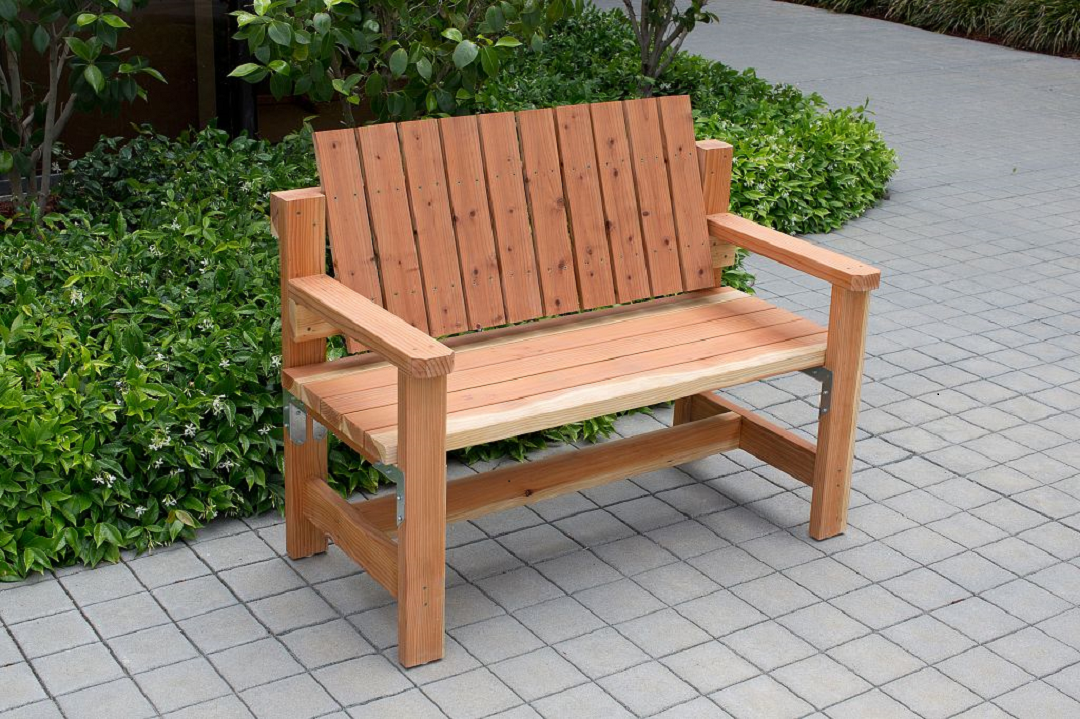
Assembly is fast and easy. With 2×4 lumber and Simpson Strong-Tie Rigid Tie® RTA2Z connectors, you can customize to the dimensions of your choosing. Use cedar or redwood for that natural look, or use non-treated lumber and protect it with your favorite paint color.
Download the plans for this DIY Garden Bench here.
Tools List
- Saw
- Drill/screw gun
- Torx-head bit
- ¼” hex- head bit
- Tape measure
- Framing square
- Pencil
- Clamps
- Safety glasses
Installation Instructions
- Cut lumber to size. Simpson Strong-Tie® connectors make it easy to create strong right-angle connections with wood.
- Attach seat planks to seat supports. Lay five seat planks (A) close together with the good side face down. Place seat supports (B)3/4″ from the ends of the planks. Evenly space the planks by inserting a 0.162″ x 3 1/2″ nail between them. Attach seat supports to planks using two #10 x 2 1/2″ Deck-Drive™ DSV Wood screws.
- Connect seat supports and seat planks to legs. Place two RTA2Z connectors 15″ up from the bottom of each front leg (C) and each back leg (D). Connect seat supports to the connectors using #9 x 11/2″ Strong-Drive® SD Connector screws.
- Attach short stretchers. Attach short stretchers (E) 4″ from the bottom of the front (C) and back legs (D) using two 21/2″ DSV screws per leg.
- Attach back supports. Attach lower back support (F) to inside of back legs 24″ from the bottom using two 21/2″ DSV screws per side. Attach the upper back support (G) flush with the top of the outer side of back legs. (Note: Use four 2 1/2″ DSV screws positioned diagonally on each side — two through the front and two through the back.)
- Attach arm rests. Attach arm rests (H) to front legs (C) and lower back support (F) using four 21/2″ DSV Wood screws.
- Connect stretchers. Connect the long stretcher (I) to the short stretchers (E) at 6″ from the inside of the back legs (D) using 21/2″ DSV screws.
- Attach back slats. Attach back slats (J) to lower back support (F) and upper back support (G) using four #10 x 2″ DSV Wood screws per slat. Start each end slat approximately3/8″in from each back leg (D) and evenly space by inserting a 0.162″ x 3 1/2″ nail in between the slats.
Hardware Needed
- (8) Rigid Tie® RTA2Z connectors
- (64) #9 x 1 ½” Strong-Drive® SD Connector screws
- (40) #10 x 2″ Deck-Drive™ DSV Wood screws
- (56) #10 x 2 ½” Deck-Drive DSV Wood screws
Lumber Needed
- (7) Pieces 2×4 x 8′ redwood lumber
- (2) Pieces 1×4 x 8′ redwood lumber
*Use redwood, cedar or non-treated wood with exterior-grade paint or stain.
Cut List
Cut from 2×4 x 8′
- (4) 47 ½” seat planks
- (1) 47½” seat plank A
- (2) 24″ front legs C
- (2) 18 ½” short stretchers E
- (2) 18 1/2″ seat supports B
- (1) 21″ arm rest H
- (2) 32″ back legs D
- (1) 21″ arm rest H
- (1) 46″ lower back support F
- (1) 46″ upper back support G
- (1) 41″ long stretcher I
Cut from 1×4 x 8′
- (10) 18″ back slats J
Find more do-it-yourself project plans at strongtie.com/diy.